Cart Keeper
Cart Keeper
Cart Keeper
The add-on changes how the cart behaves in two situations where the CS-Cart core silently removes a product.
The product ran out of stock. The core removes such a product from the cart on the next recalculation, leaving the customer wondering where the item went. The add-on intercepts the removal: the row stays in the cart table, becomes dimmed, an Out of stock label appears under the image, and the item is excluded from totals, shipping and the order. Next to it the customer is offered in-stock Similar products and a back-in-stock notification subscription. As soon as the product is back in stock, the label changes to Back in stock, and the customer returns the item to the order with one click — or the add-on does it by itself if auto-return is enabled.
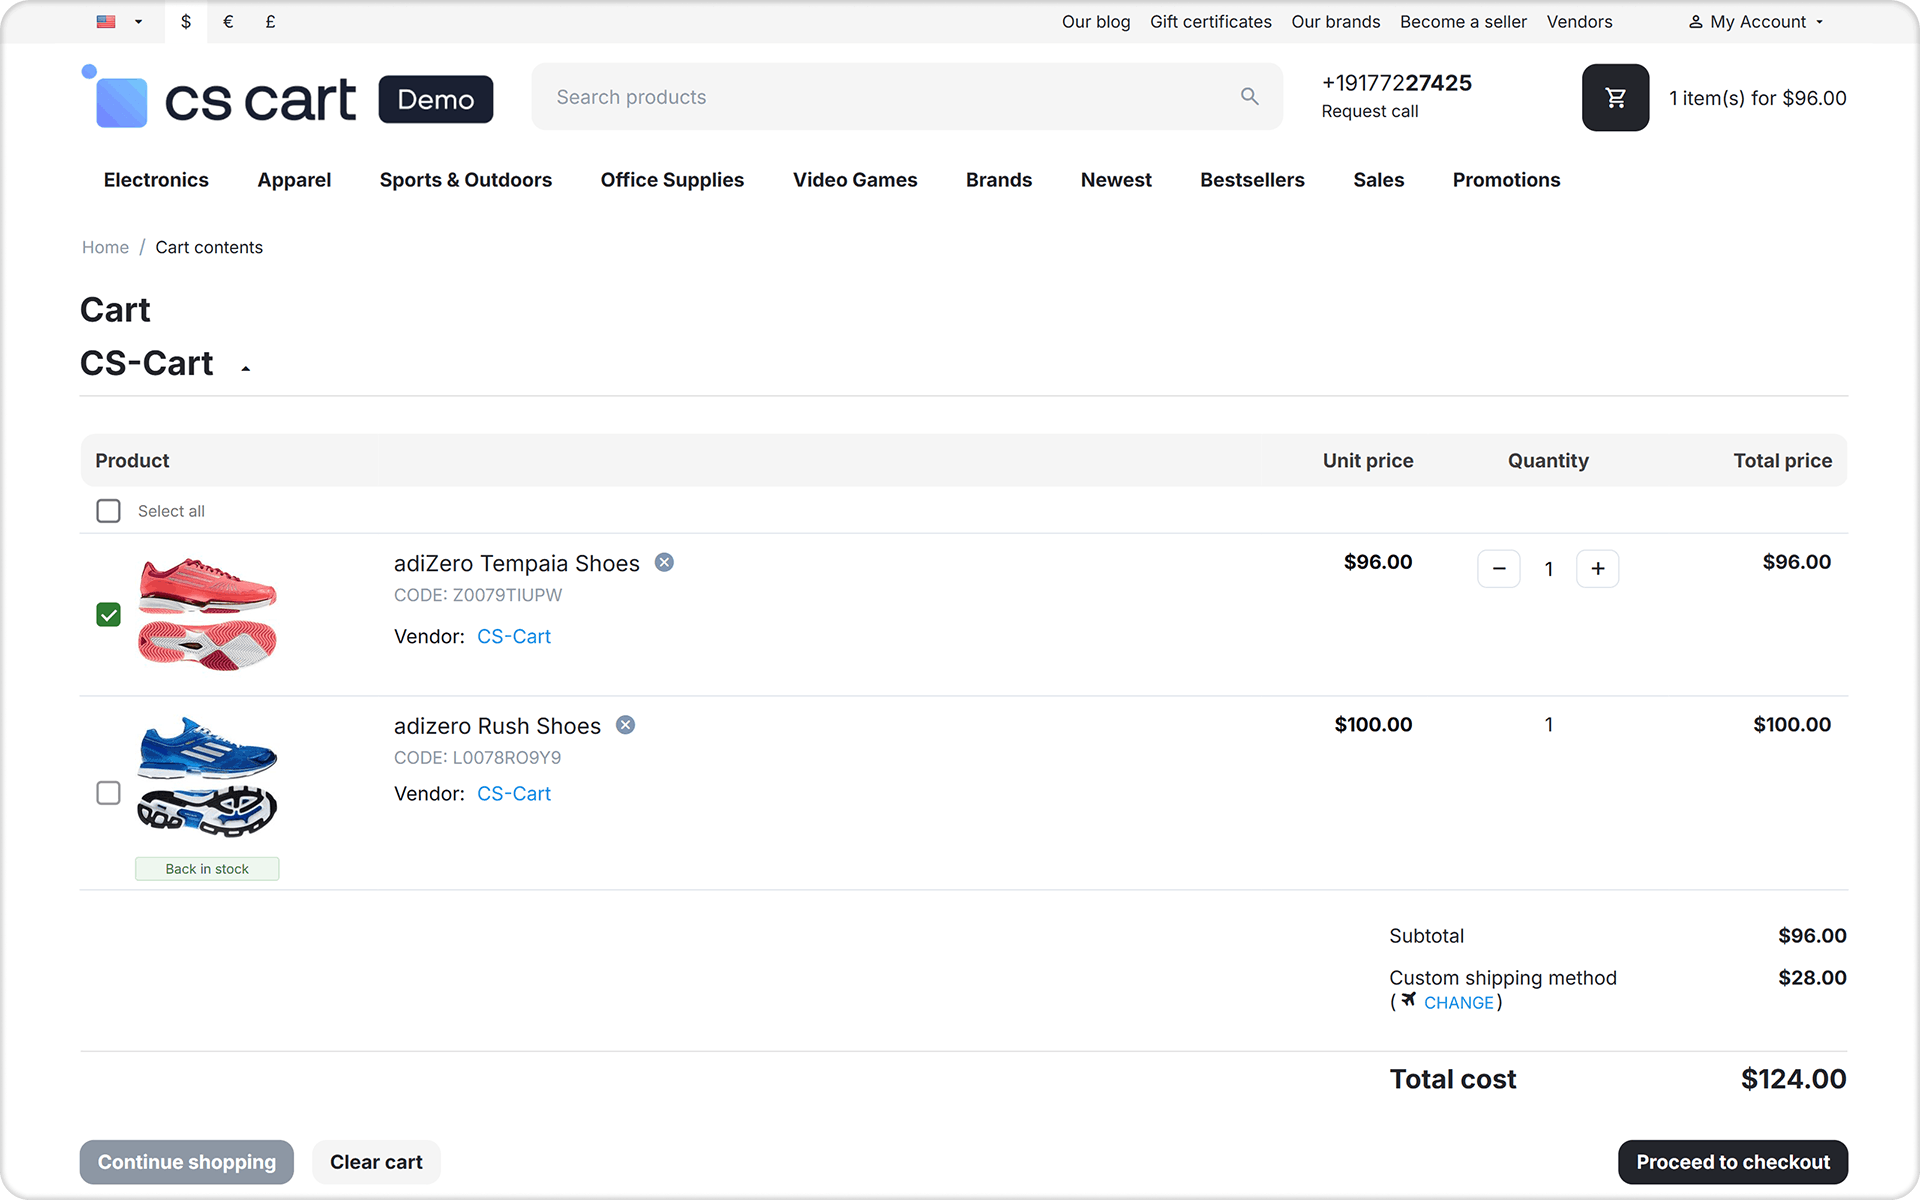
The customer does not want to buy everything at once. Every cart row gets a checkbox. Unchecking it excludes the item from the order: the row stays where it was, but the item is excluded from totals and from the order. Checking it again returns the item to the order. The Select all row at the top of the table excludes or returns all items at once.
Items not included in the order are saved in the database together with the cart: a registered customer sees them after signing in from any device.
The add-on settings — cart layout, auto-return, what happens to unchecked items, the limit on kept items, similar product selection and the notification subscription — are set on the Add-ons → CS-Commerce Addons → Cart Keeper page.
The add-on works on the storefront. It changes nothing in the administration panel, including orders created or edited by an administrator.
The add-on works with CS-Cart and Multi-Vendor starting from version 4.3.1 and supports the CS-Cart, CS-Cart Ultimate, Multi-Vendor, Multi-Vendor Plus and Multi-Vendor Ultimate editions.
The add-on plugs into the product table on the cart page through the standard hooks of the views/checkout/components/cart_items.tpl template of the Responsive theme and themes based on it. If your theme overrides this template and lacks the checkout:items_list, checkout:product_icon and checkout:extra_list hooks, the checkboxes and the rows of items not in the order will not appear on the storefront until the hooks are put back into the template. The marker on the cart icon in the site header uses the checkout:dropdown_title hook.
UniTheme2. Starting from version 4.19.1.c the UniTheme2 theme builds the cart with div blocks instead of a table. The add-on detects the cart markup automatically from the template of the active theme and uses the matching set of templates for the rows of items not in the order; if needed, the markup is selected manually with the Cart layout setting. Earlier UniTheme2 versions and all other themes use the standard table.
On Multi-Vendor the add-on supports separate checkout per vendor (the Direct Customer-to-Vendor Payments add-on): each vendor has its own table, its own Select all row and its own items not in the order.
Similar products and the back-in-stock notification rely on standard CS-Cart mechanisms: variation selection requires the Product Variations add-on to be enabled, the subscription uses the standard back-in-stock notifications.
If the add-on conflicts with your theme or another solution, please contact our support center.
After success payment, your order will be automatically marked as Paid within a few minutes. Once order changed to Paid status - add-on License activation passed success and you will received an e-mail with confirmation the receipt of payment and a second e-mail with a download add-on link. You can also download the add-on in our License Management section of our website. To install the add-on on your website, please follow these steps:
- Download the latest version of the add-on on our website in the "License Management" section or via the link sent by e-mail.
- Go to Add-ons → Manage Add-ons and in the gear button, select Manual Installation.
- Select the downloaded file and complete the installation of the add-on.
Add-on installation is completed. To go to the add-on settings page, select the installed add-on in the top menu Add-ons → CS-Commerce add-on
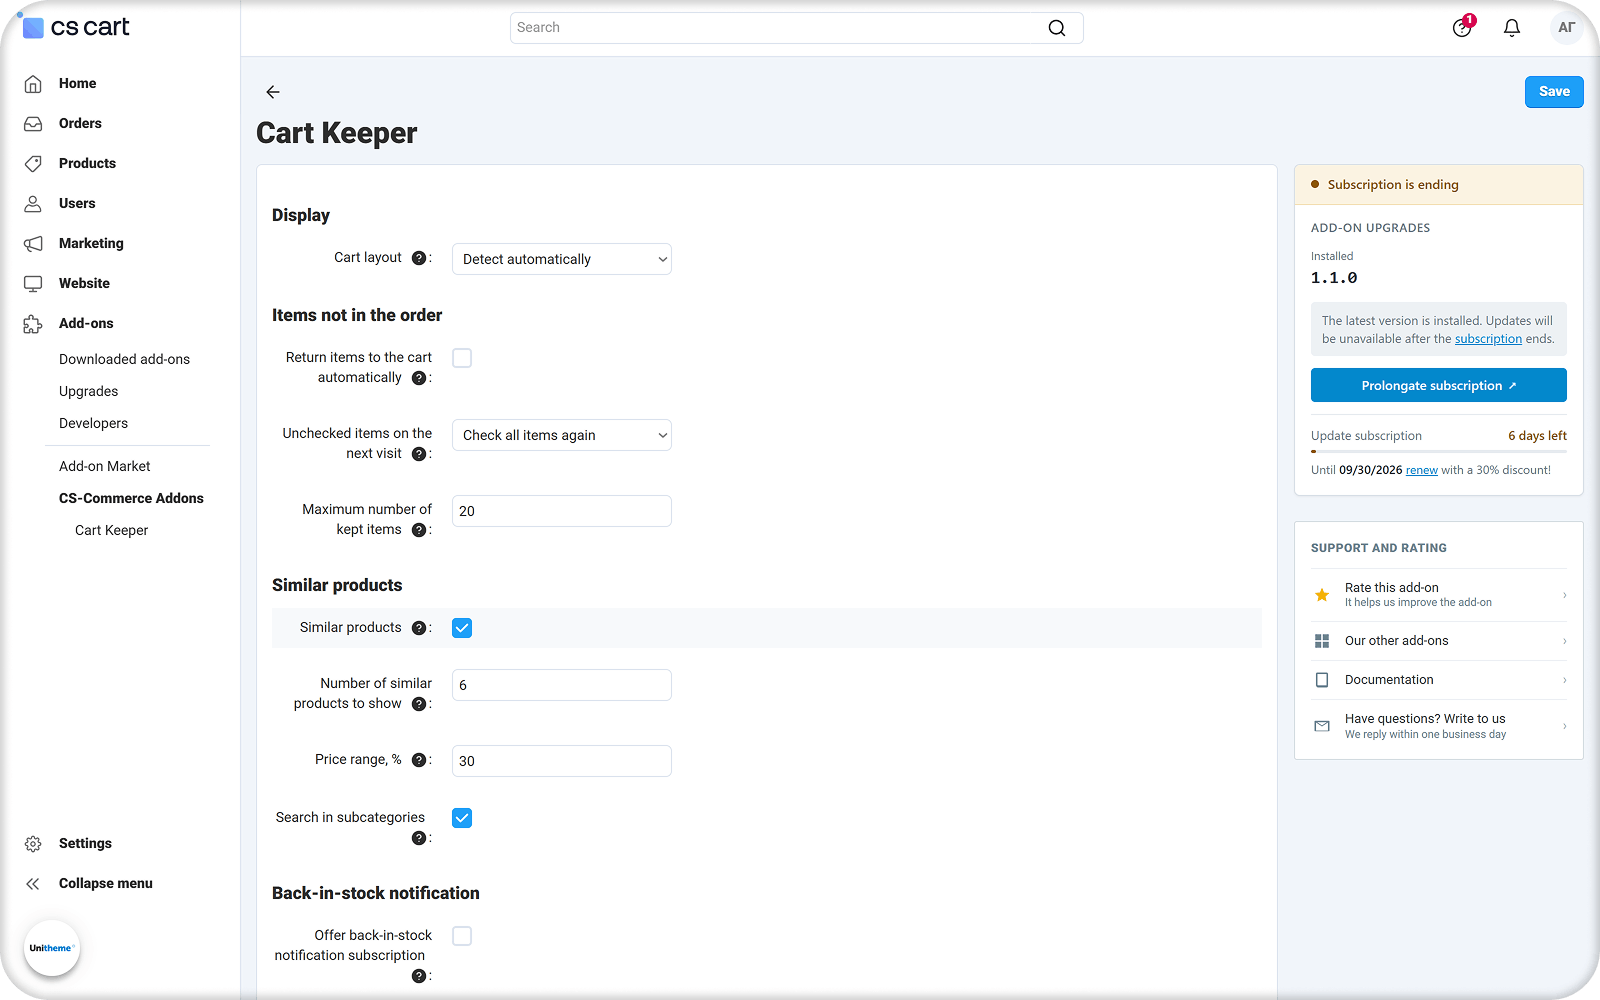
The add-on settings page is located at Add-ons → CS-Commerce Addons → Cart Keeper. You can also get there through Add-ons → Manage add-ons: when you open the add-on settings from the general list, the system redirects you to this page automatically.
The settings are grouped into four sections: Display, Items not in the order, Similar products and Back-in-stock notification; each is covered in the General settings article. On the right there are blocks with information about the installed add-on version and the upgrade subscription period, a link to the documentation and an add-on rating form.
Settings per storefront
In the CS-Cart Ultimate and Multi-Vendor Ultimate editions with several storefronts, the settings are stored separately for each storefront. The storefront is selected with the switch in the page header. Until a storefront is selected, the fields cannot be edited and the standard Ultimate padlock icon appears next to each of them — when unlocked, the value is written to all storefronts at once.
In Multi-Vendor with a single storefront the settings are shared across the whole marketplace; there are no separate values for vendors.
Access rights
The add-on adds its own privilege group — Manage Cart Keeper. It contains two privileges: viewing the settings page and changing it. By default they are not granted to any user group, so an administrator with restricted permissions will not see the settings page until the privileges are granted to their group.
Privileges affect access to the settings page only. The cart behaves the same way for every customer on the storefront regardless of administrator permissions.
Display
Cart layout — determines the markup of the rows of items not included in the order. The default is Detect automatically: the add-on reads the cart template of the active theme and picks the matching markup. UniTheme2 (4.19.1.c and later) is the cart built with div blocks, as in recent UniTheme2 versions; Standard table is the table of the Responsive theme, earlier UniTheme2 versions and all other themes. Change the value manually only if the rows of items not in the order do not match the other rows of your cart.
The detection result is cached. If the rows stop matching the cart after a theme update, clear the store cache.
Items not in the order
Return items to the cart automatically — disabled by default. When an out-of-stock item becomes available again, it is returned to the order automatically as soon as the customer opens the cart or checkout page. The page shows the notification The product … is back in stock and has been returned to the order. Auto-return applies to out-of-stock items only; items the customer unchecked manually are not affected. When the setting is disabled, the row of an item that is back in stock is no longer dimmed, a green Back in stock label appears under the image, and the customer returns the item to the order by themselves — with the row checkbox or the Select all row.
Unchecked items on the next visit — what happens to the items the customer unchecked but did not order. The default is Remember the last state: the items stay unchecked until the customer checks them again — after a break and after signing in on another device alike. Check all items again returns such items to the order on the next visit: after a break longer than the session lifetime (2 hours by default) or after signing in on another device. Within one visit the customer's choice is always kept. Out-of-stock items are not affected by this setting — they return to the order only when they are back in stock.
Maximum number of kept items — how many out-of-stock and unchecked items are kept per customer. The default value is 20, the allowed range is 1 to 100. When the limit is exceeded, the oldest items are dropped — the ones that were excluded from the order or ran out of stock before the others. On Multi-Vendor with separate checkout the limit applies to each vendor's cart separately; the same limit applies when the saved list is restored after signing in.
Every kept item stores the product name, price, quantity, selected options and attachments. Twenty items is enough for most stores; raising the value makes sense when customers build long lists in the cart and actively use the checkboxes.
Similar products
Similar products — enabled by default. An out-of-stock item in the cart gets a Similar products button; clicking it opens a dialog with in-stock products that can be added to the cart instead of the out-of-stock one. How the products are selected is described in How the cart works with the add-on. Items the customer excluded from the order manually have no button.
Number of similar products to show — the maximum number of products in the dialog. The default value is 6, the allowed range is 1 to 24.
Price range, % — products from the same category are selected within ± this percentage of the out-of-stock item price (the price of the cart item is used). The default value is 30, the allowed range is 0 to 100; 0 disables the price limit. If nothing is found within the range, the add-on shows products of the category regardless of price.
Search in subcategories — enabled by default. Products are selected not only from the category of the out-of-stock item but from its subcategories as well.
Back-in-stock notification
Offer back-in-stock notification subscription — disabled by default. When enabled, the row of an out-of-stock item shows the standard CS-Cart checkbox Notify me when this product is back in stock; a guest customer also gets an e-mail field next to it. The notification e-mail is sent by the core itself — the add-on only puts the subscription form into the cart.
The checkbox appears only for products the standard subscription is possible for: inventory tracking is enabled in the store and negative stock is not allowed, the product's Out of stock actions field is set to Sign up for notification, the stock is tracked for the product as a whole rather than per option, and the product is not downloadable. For a product with variations the subscription is made for the specific variation that is in the cart.
After changing the values, click Save. The new values take effect immediately; when the limit is lowered, already kept items are trimmed on the next change of the list.
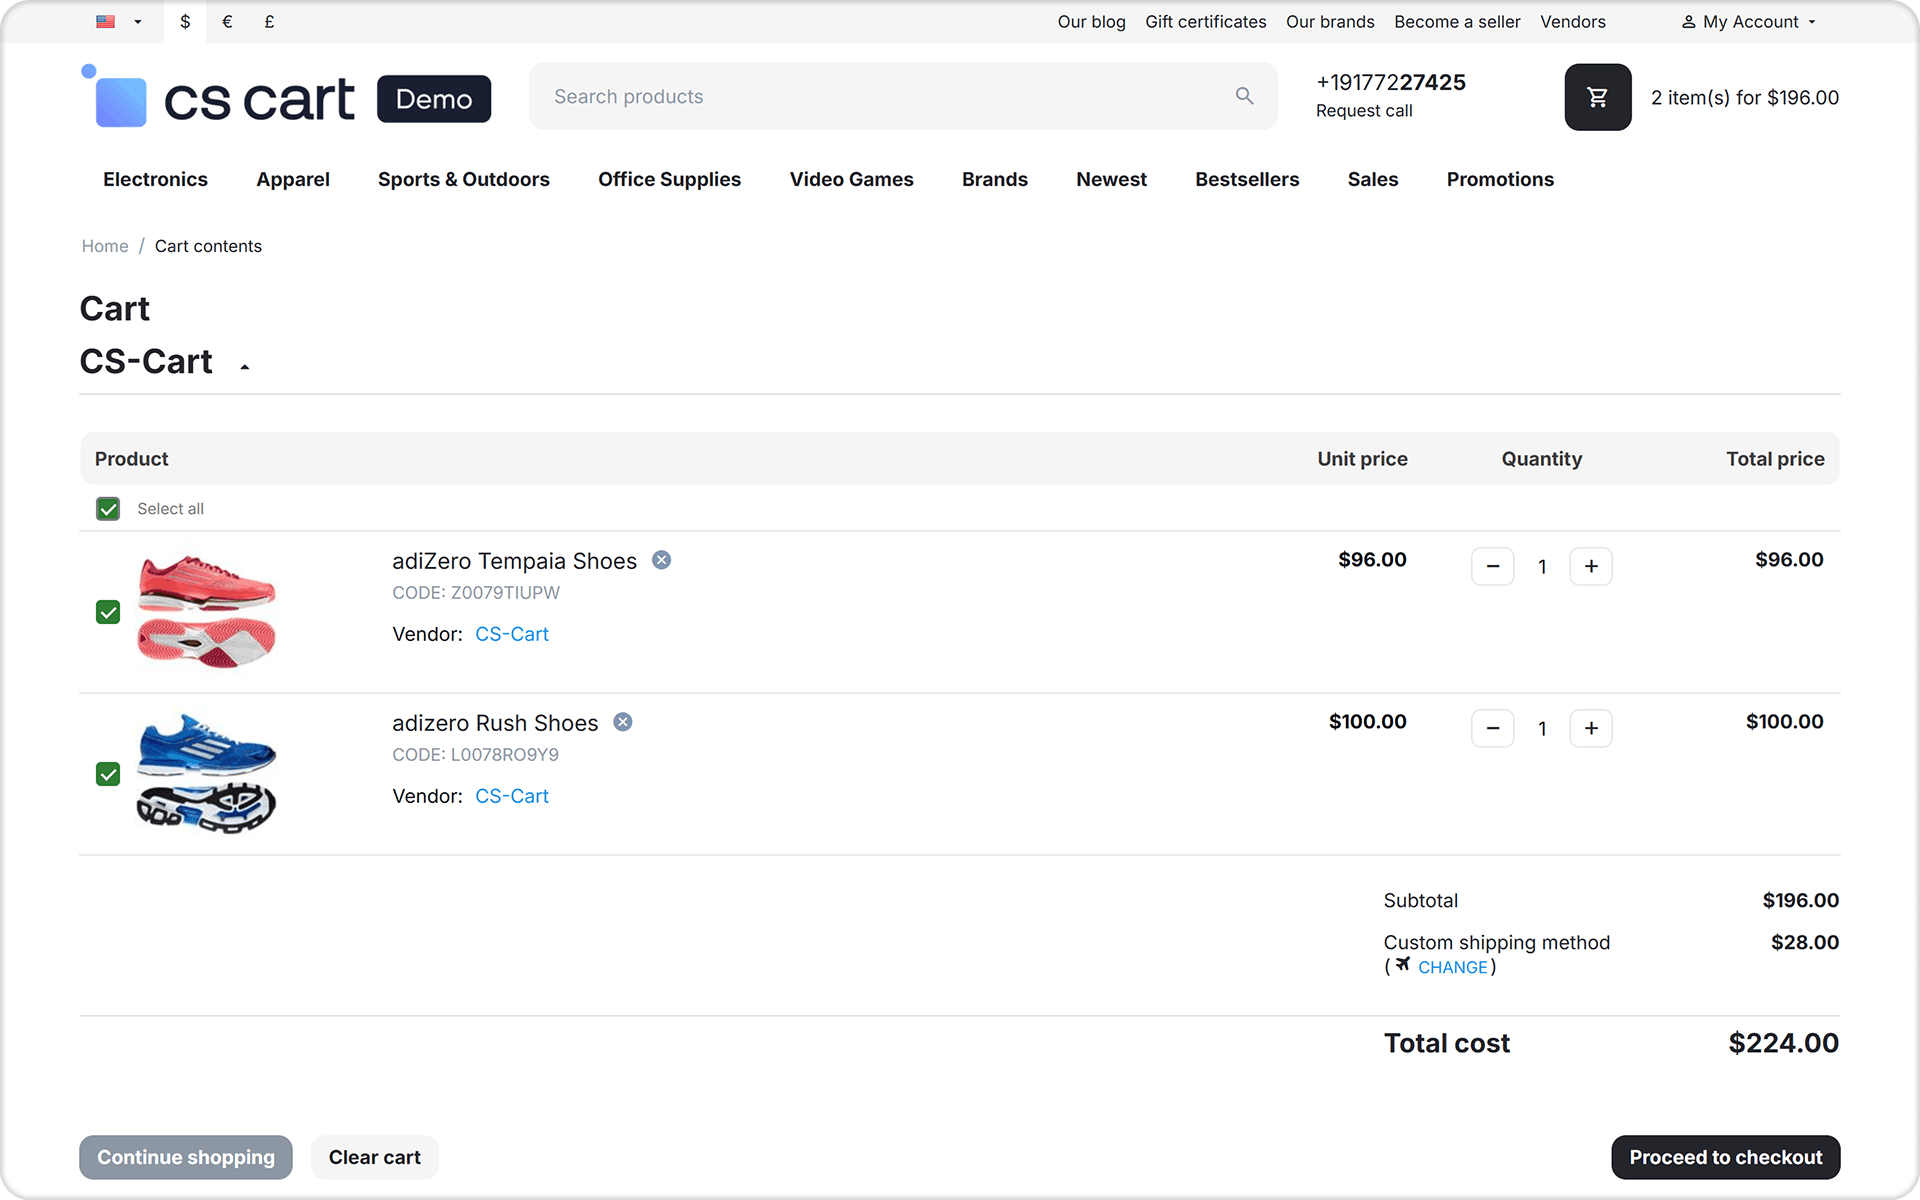
Everything the add-on does happens on the cart page and during checkout. Three new elements appear in the product table: a checkbox on every row, a Select all row at the top of the table, and dimmed rows of items not included in the order and out-of-stock items.
The row checkbox
The checkbox sits to the left of the product image. It is checked by default — the item is part of the order; the tooltip reads Included in the order. Uncheck to exclude the item from the order.
Unchecking it excludes the item from the order. The row stays where it was but becomes dimmed; its quantity can no longer be edited, and the price, cart totals, shipping cost and the list of products in the order are recalculated without this item. The add-on shows the notification The product … is excluded from the order. Checking it again (Not included in the order. Check to add the item back) returns the item to the order with the same quantity and options that were selected, and to the same place in the table.
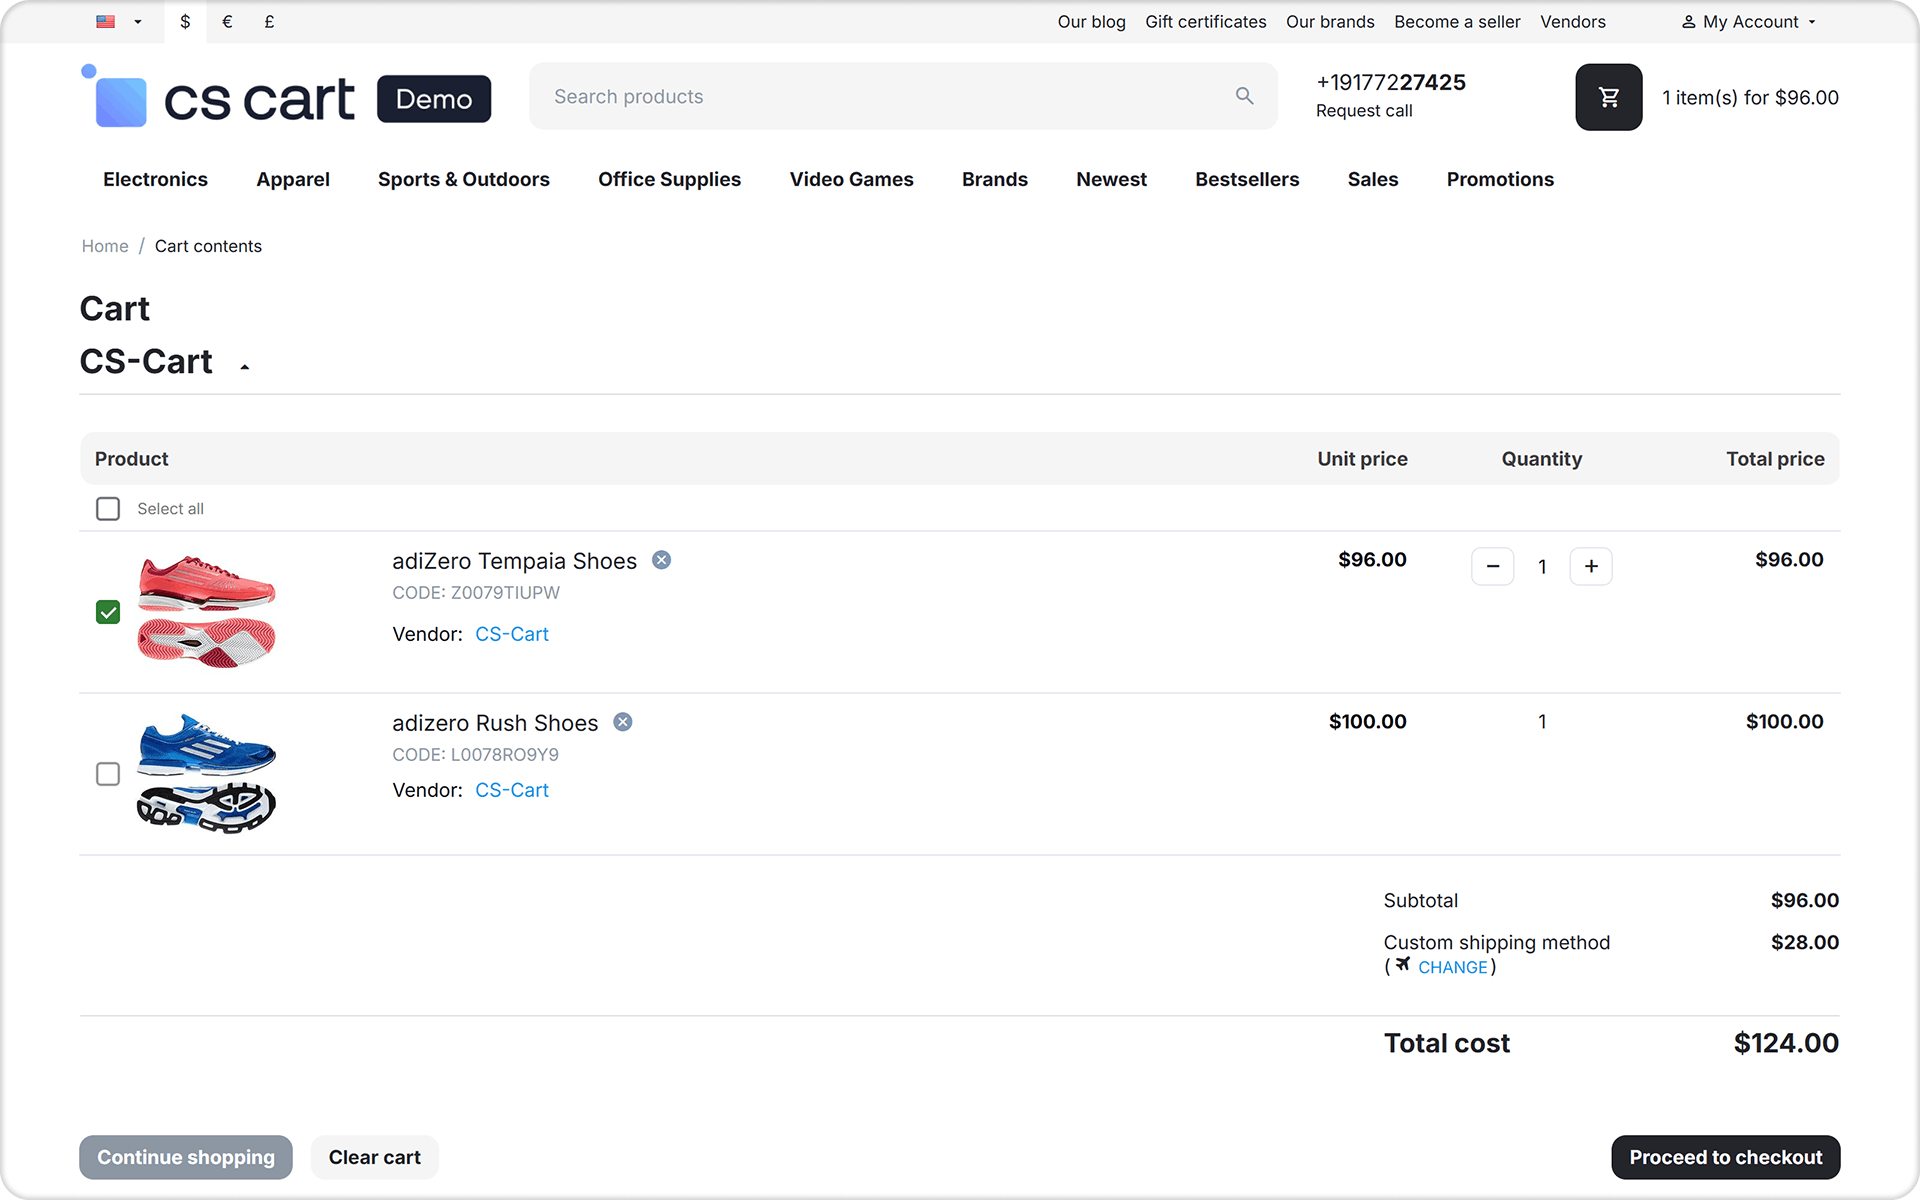
The cross to the right of the product name removes such an item from the cart completely, together with the files uploaded for it.
The "Select all" row
The first row of the table holds a single checkbox and the Select all label. Its state depends on what is currently in the cart:
- if there are items not in the order that are available for purchase, the checkbox is unchecked — a click returns all such items to the order (Include all available items in the order);
- if every item is in the order, the checkbox is checked — a click excludes all cart items from the order (Exclude all items from the order);
- if only out-of-stock items are left in the cart, the checkbox is disabled (No items available for the order).
The product ran out of stock
The CS-Cart core recalculates the cart every time it is opened and on every checkout step. If a product with inventory tracking has no stock left at all, or less than the minimum order quantity, the core removes it from the cart. The add-on intercepts that removal: the row stays in the table in a dimmed state, its checkbox is disabled (Out of stock — cannot be ordered right now), and an Out of stock label appears under the image. The standard core warning is replaced with the notification The product … is out of stock. It stays in your cart but is not included in the order.
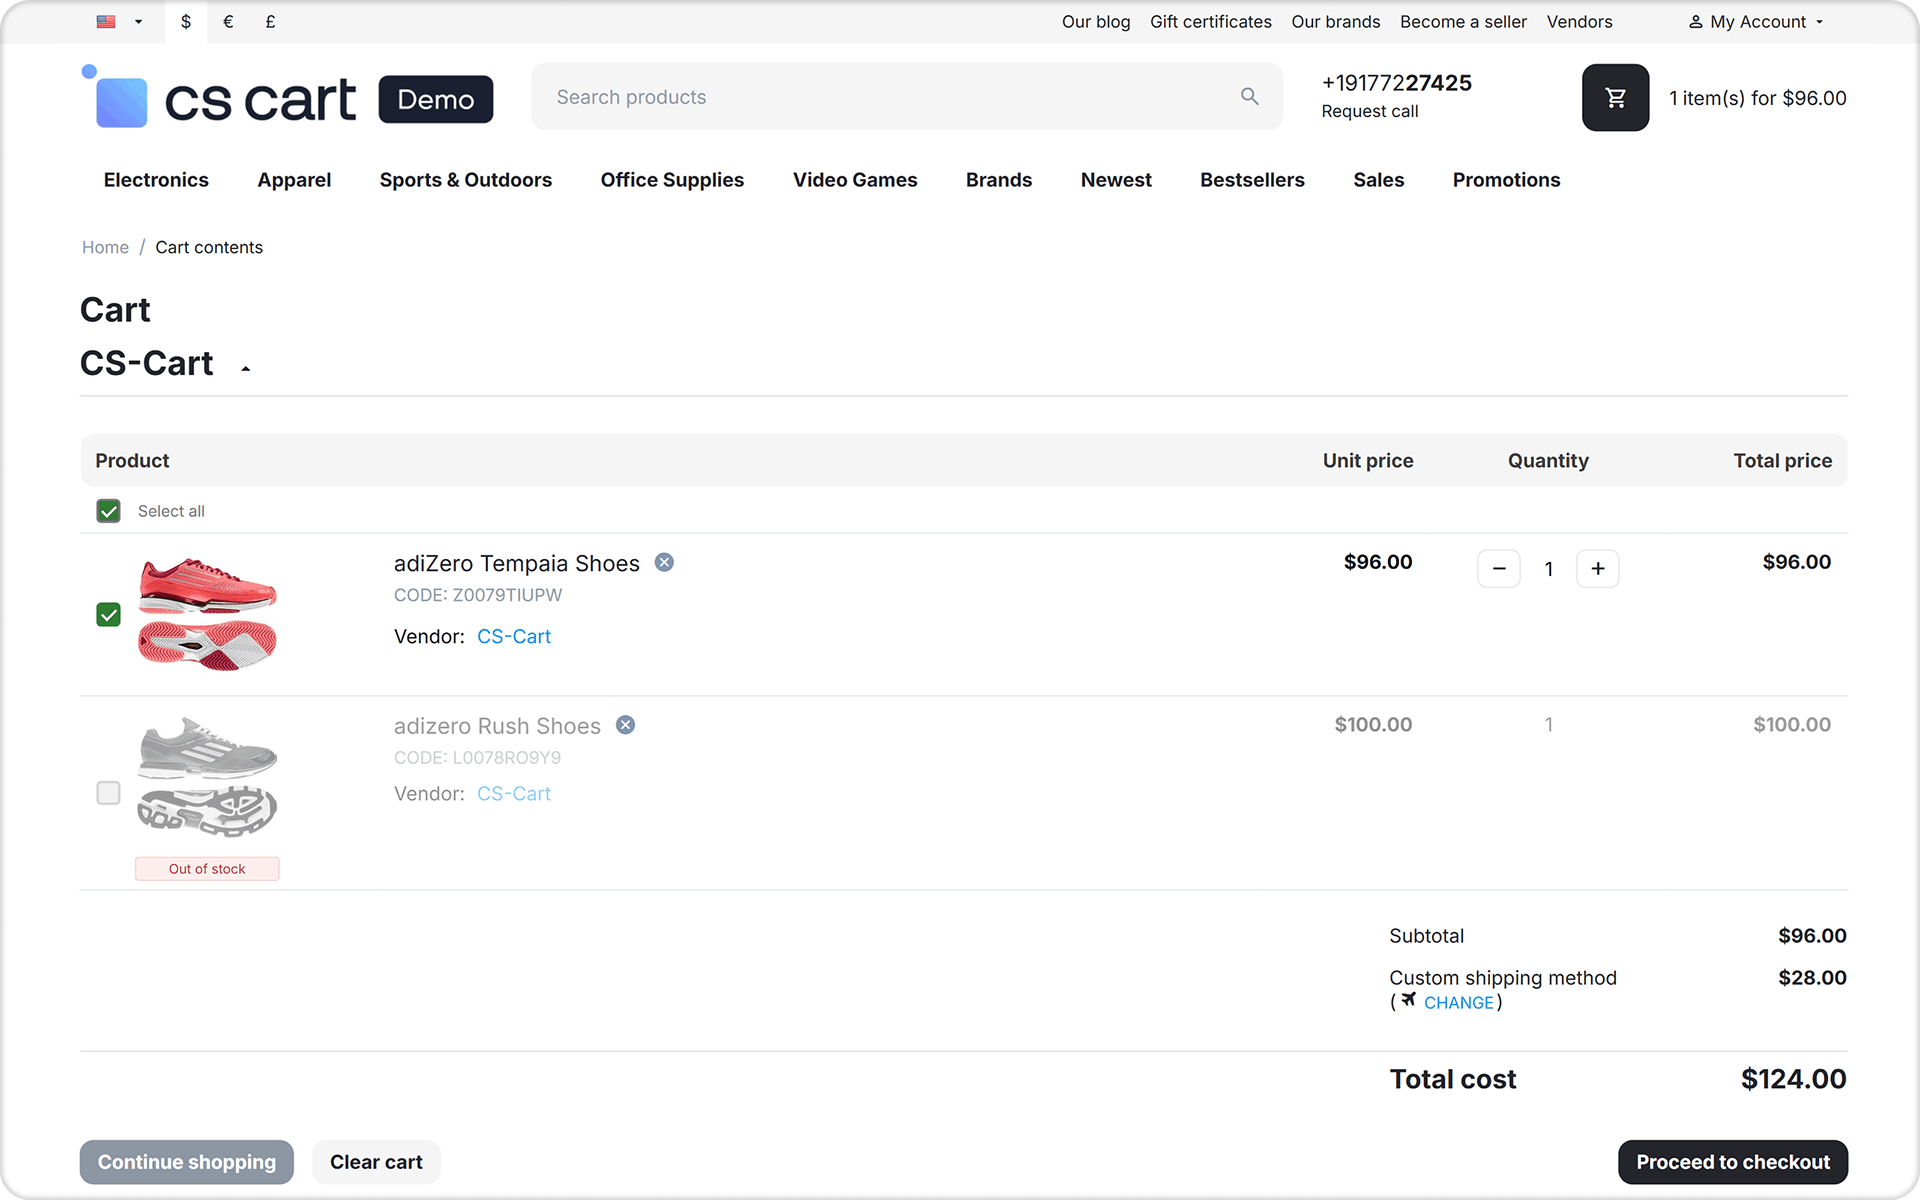
Out-of-stock items move to the bottom of the cart table, the most recent ones first. For a product with variations the stock is checked for the variation that is in the cart, taking other rows with the same variation into account.
If the stock is lower than the customer needs but not zero, the core does not remove the product — it reduces the quantity in the cart to the available one. The add-on does not interfere with this scenario; the customer sees the standard core message about the corrected quantity.
Every time the cart is opened, the add-on checks whether the item is available again — in the saved quantity and with the saved options. As soon as it is, the row returns to its former place in the table, is no longer dimmed, the checkbox becomes active, and a green Back in stock label appears under the image. From there the item returns to the order via the checkbox, the Select all row, or automatically — see the Return items to the cart automatically setting.
Similar products
While the item is out of stock, its row shows the Similar products button (if enabled in the settings). Clicking it opens a dialog with the caption Instead of "…" you can choose: and a list of in-stock products: image, name, SKU, price, options and an Add to cart button. The added product goes into the cart as a regular row, while the out-of-stock one stays in the table — the customer can remove it with the cross or leave it waiting for restock.
The selection takes two steps. First come other variations of the same product, if it was created with variations. Then, if there is still room in the dialog, products from the main category of the out-of-stock item (with subcategories, if the setting allows it) within the configured price range, by popularity. Only in-stock products are shown; products already in the cart are not offered. If nothing is found within the price range, the range is dropped. When there is nothing to offer, the dialog says No similar products are in stock right now.
Back-in-stock notification subscription
If the Offer back-in-stock notification subscription setting is enabled, the row of an out-of-stock item shows the standard CS-Cart checkbox Notify me when this product is back in stock. A registered customer simply checks it; a guest enters an e-mail address in the field that appears and confirms the subscription. From there the usual CS-Cart mechanism takes over: the e-mail is sent when the product is back in stock. The conditions under which the checkbox is shown are listed in the setting description.
When every item is excluded from the order
When no item in the cart is selected, the page does not switch to "Your cart is empty": the table with the items not in the order stays on screen and the Proceed to checkout button becomes inactive. If the customer tries to go to checkout directly, they see the message titled No products selected: No products are included in the order. Check the items you want to order.
While the cart has no item included in the order, the cart icon in the site header is marked with a dot with the tooltip Your cart has items not included in the order, and clicking it goes straight to the cart page instead of opening the dropdown.
The Clear cart button removes both regular items and items not in the order.
Items the add-on does not keep
- products that are part of another product (product sets, parts of a configurable product) — they follow the parent item;
- gifts and free products added by promotions;
- products without inventory tracking and products allowed for pre-order — from the core's point of view they cannot "run out", so they are never removed from the cart and there is nothing to keep; their checkbox works as usual.
Where items not in the order are stored
Out-of-stock and excluded items live in the customer's session next to the cart and, just like the cart itself, are written to the database — into the same saved-carts table, as a separate record type. This means:
- a registered customer gets their list on any device and in any browser after signing in — together with the cart. On logout the list disappears from the session but stays saved and comes back on the next sign-in;
- a guest customer gets the list in the same browser as long as the saved-cart cookie lives (one week by default) — just like regular cart items;
- if the customer places an order while items not in the order remain in the cart, they stay in the cart after the order is placed;
- the Maximum number of kept items limit applies to the restored list as well.
Whether the items the customer unchecked return to the order on a new visit is controlled by the Unchecked items on the next visit setting.
Multi-Vendor and separate checkout
Without separate checkout there is a single cart, and the rows of items not in the order show the vendor just like regular items do. When the Direct Customer-to-Vendor Payments add-on is enabled and orders are placed per vendor, each vendor has its own table, its own Select all row and its own items not in the order. If a vendor has nothing but such items left, its block does not disappear from the page, and the checkout button for that vendor's order becomes inactive.
In order to have access to add-on upgrades, you must have an active upgrade subscription. If the subscription period has expired, you will only have access to upgrades released before the expiration date of your subscription. You can renew your upgrades subscription in the "License Management" section on our website.
The add-on supports instant upgrades via the CS-Cart Upgrade Center. The built-in CS-Cart Notification Center (bell) will notify you about new versions release of the add-on. Upgrades via Upgrades Center will allow you to switch to a newer version without losing add-on data and settings.
Before start an upgrade process, it is highly recommended to make a full backup of the site (database and files) of your store using the server or hosting methods.
Upgrade through the Upgrade Center
- In the top menu, go to Administration → Upgrade Center;
- In the gear menu, click "Refresh available upgrades"
- Find and add-on on list of available upgrades and click the Download button and than Install button;
- Follow all the instructions that will be shown during the upgrade process;
- It is recommended to clear the CS-Cart templates cache after the upgrades are installed by deleting the var/cache folder on your server or adding the ctpl parameter to the address bar (example: https://domain.com/admin.php?ctpl).
Addon Reinstallation by uninstall old and install new:
Reinstalling an add-on means deleting the add-on's settings and data. Reinstallation will allow you to get a clean installation of the latest addon version. To reinstall the add-on with saving the add-on settings and data, please contact us via our Support Center to provide this service.
To completely reinstall an add-on without saving data, follow these steps:
- Go to Add-ons → Manage add-ons and find the old installed add-on.
- Click the delete button in the gear menu of the add-on.
- Download the latest version of the add-on on our website in the "License Management" section.
- Go to Add-ons → Manage add-ons and in the gear menu select Manual Installation. Select the previously downloaded file and complete the installation of the add-on.
The technical support of the add-on is already included in its price. Before contacting the support center, please make sure you are using the latest released version of the add-on. Old versions of the add-on are not supported by technical support.
To use our technical support, follow these steps:
- On our support center site https://helpdesk.cs-commerce.com/, log in with your account;
- Click on the "Create ticket" button;
- Fill in all the required fields and create ticket (you will receive a confirmation email);
- Expect a response from a specialist (a notification will be sent to your e-mail about the response) in accordance with the regulations of the technical support service.
If you have not received an answer within the time frame specified in the regulations, write us a message to the e-mail [email protected] with the subject of the ticket and we will try to resolve your issue as soon as possible.
Technical support via chat on the site, direct phone calls or e-mail letters is not provided. All help discuss goes through the support center. Carefully study the documentation for the add-on and the terms of technical support before creating a ticket. We recommend that you familiarize with the general restrictions:
- Fragments of code or some files of an add-on may have a private (encoded) part. The coded part does not create problems on add-on customizations;
- The add-on will work only on those domains that are specified in the user's license. If you try to use the solution the domains of which are not included in the license, the add-on will be automatically disabled;
- Installing on local machines is not allowed by the licensing system. For the add-on to work on an additional domain (alias), specify this alias on the license management page. Up to three aliases are allowed per domain for testing and development purposes. You can change the main license domain yourself on the license management page.
To have possibility to add or change license domains and aliases, the upgrade subscription must be active. To change the license domain of an expired upgrades subscription, you must first renew your subscription.
Version 1.1.0 of September 21, 2026
- [+] Items not in the order are saved in the database together with the cart: a registered customer sees them after signing in from any device;
- [+] Similar products: an out-of-stock item gets a button offering in-stock variations and products from the same category (configurable in the add-on settings);
- [+] Back-in-stock notification: added an option to show the subscription checkbox right in the cart row;
- [+] Added the "Unchecked items on the next visit" setting: remember the customer's choice or check all items again;
- [+] Added the "Cart layout" setting with automatic detection: support for the div-based cart of UniTheme2 4.19.1.c and later;
- [+] The cart icon in the header is marked when only items not in the order are left in the cart;
- [*] Out-of-stock items are shown at the bottom of the cart table; for products with variations the stock is checked for the selected variation;
- [!] Fixed a compatibility issue with recent versions of the UniTheme2 theme.
Version 1.0 of September 17, 2026
- The first release of the add-on.