Google One Tap Sign-In
Google One Tap Sign-In
Google One Tap Sign-In
The add-on brings Google sign-in to the storefront: the official Google button in the sign-in and registration forms and the One Tap prompt for guests. The customer picks their Google account in a pop-up, the store verifies the token received from Google and opens the session. No password and no confirmation e-mail are needed.
New customers. If there is no account with the e-mail of the Google account, one is created automatically: the first and last name come from the Google profile, the e-mail is already verified by Google. The store's standard registration e-mail can be sent to the customer.
Existing customers. If the e-mail is already registered, the customer enters their own account and the Google account gets linked to the profile. The link is visible in the customer area, where it can be removed or set up again. Orders placed as a guest before signing in are attached to the account.
Security. The token is verified on the store server against Google's public keys: signature, issuer, lifetime, audience (your application) and the verified e-mail flag. No application secret is needed. Only customers can sign in through Google; administrator and vendor accounts are never affected. Sign-in can be limited to certain e-mail domains.
The add-on settings — the Client ID, the look of the button, the One Tap prompt, the rules for creating and linking accounts, the log of rejected sign-ins — are set on the Add-ons → CS-Commerce Addons → Google One Tap Sign-In page.
The add-on needs an OAuth client in Google Cloud Console (see Setting up the Google Cloud application) and a storefront served over HTTPS: Google shows the One Tap prompt on secure pages only.
The add-on works with CS-Cart and Multi-Vendor starting from version 4.3.1 and supports the CS-Cart, CS-Cart Ultimate, Multi-Vendor, Multi-Vendor Plus and Multi-Vendor Ultimate editions.
On the storefront the add-on plugs in through the standard hooks of the Responsive theme and themes based on it. The Google button is rendered by the index:login_buttons hook of the views/auth/login_form.tpl template, which is used by the sign-in pop-up, the sign-in page, the My account block and the sign-in forms at checkout; the block on the registration page and in the customer profile uses the profiles:account_update hook of views/profiles/update.tpl. If your theme overrides these templates without the hooks, the button and the linking block will not appear until the hooks are put back.
The button and the One Tap prompt themselves are drawn by the Google Identity Services library loaded from accounts.google.com. It needs a storefront served over HTTPS (Google does not show One Tap on HTTP), the store domains listed in the Authorized JavaScript origins of the OAuth client, and the customer's browser being able to reach Google. In Chrome the One Tap prompt works through FedCM.
On Multi-Vendor only customers sign in through Google: vendor and administrator accounts are never affected. In editions with several storefronts the settings are kept per storefront.
Next to the Yandex ID Sign-In add-on by CS-Commerce the Google and Yandex buttons line up in one column under a shared divider.
If the add-on conflicts with your theme or another solution, please contact our support center.
After success payment, your order will be automatically marked as Paid within a few minutes. Once order changed to Paid status - add-on License activation passed success and you will received an e-mail with confirmation the receipt of payment and a second e-mail with a download add-on link. You can also download the add-on in our License Management section of our website. To install the add-on on your website, please follow these steps:
- Download the latest version of the add-on on our website in the "License Management" section or via the link sent by e-mail.
- Go to Add-ons → Manage Add-ons and in the gear button, select Manual Installation.
- Select the downloaded file and complete the installation of the add-on.
Add-on installation is completed. To go to the add-on settings page, select the installed add-on in the top menu Add-ons → CS-Commerce add-on
The add-on settings page is located at Add-ons → CS-Commerce Addons → Google One Tap Sign-In. You can also get there through Add-ons → Manage add-ons: when you open the add-on settings from the general list, the system redirects you to this page automatically.
All the settings sit on a single General settings tab in five groups: Google Cloud, Sign-in button, One Tap prompt, Customer accounts and Diagnostics; each is covered in the General settings article. On the right there are blocks with information about the installed add-on version and the upgrade subscription period, a link to the documentation and an add-on rating form.
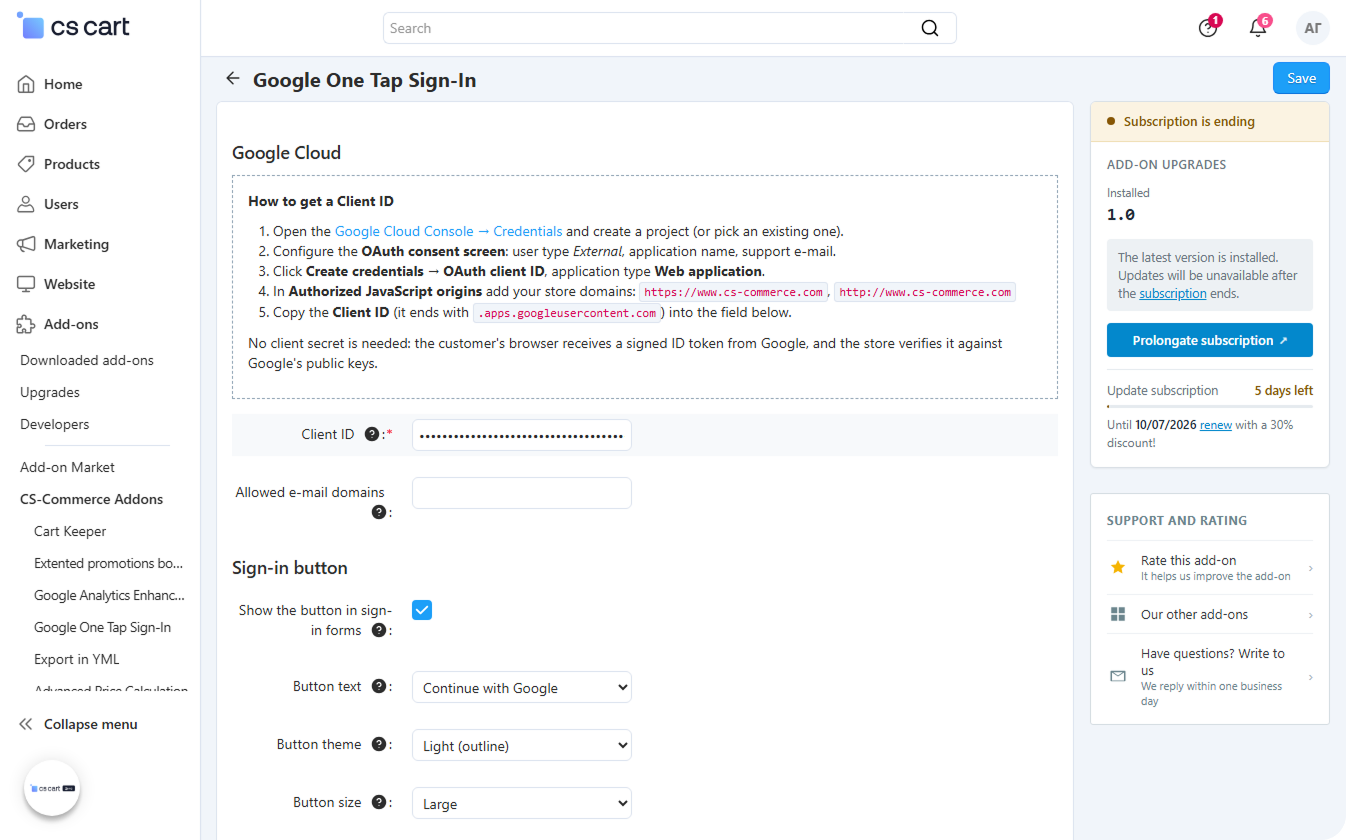
While the Client ID field is empty, the add-on shows nothing on the storefront: no button, no One Tap prompt, no linking block in the profile. How to get a Client ID is described in Setting up the Google Cloud application.
Settings per storefront
In the CS-Cart Ultimate and Multi-Vendor Ultimate editions with several storefronts the settings are stored separately for each storefront. The storefront is selected with the switch in the page header. Until a storefront is selected, the fields cannot be changed and the standard Ultimate lock icon appears next to each of them — in the unlocked state the value is written to all storefronts at once.
In Multi-Vendor with a single storefront the settings are shared by the whole marketplace; there are no separate values for vendors.
Access rights
The add-on adds its own privilege group — Manage Google One Tap Sign-In. It contains two privileges: viewing the settings page and changing it. By default they are not granted to any user group, so an administrator with limited rights will not see the settings page until the privileges are granted to their group.
The privileges affect access to the settings page only. Google sign-in on the storefront does not depend on administrator rights.
Google Cloud
The group starts with the How to get a Client ID note with a ready list of your store addresses for the Authorized JavaScript origins field; the process itself is described in Setting up the Google Cloud application.
Client ID — the OAuth 2.0 client identifier of the Web application from Google Cloud Console, ending with .apps.googleusercontent.com. A required field: while it is empty, Google sign-in is not shown on the storefront.
Allowed e-mail domains — a comma-separated list of domains, e.g. company.com, partner.org. When filled in, only Google accounts with an e-mail in these domains can sign in (the Google Workspace organisation domain is taken into account too); the others see the message Accounts of this e-mail domain are not allowed to sign in here. An empty field accepts any Google account.
Sign-in button
Show the button in sign-in forms — enabled by default. Adds the Google button to the sign-in pop-up, the sign-in page, the checkout sign-in form and the registration page. When disabled, only the One Tap prompt (if enabled) and the account linking block in the customer profile remain on the storefront.
Button text — the caption is rendered by Google in the customer's language. Options: Sign in with Google, Sign up with Google, Continue with Google (default) and the short Sign in. If the customer is already signed in to Google in the browser, Google shows their name, e-mail and picture on the button instead of the caption.
Button theme — the colour scheme: Light (outline) (default), Blue or Black.
Button size — the height: Large (default), Medium or Small.
Button shape — Rectangular (default) or Pill (rounded).
Button width, px — from 200 to 400 pixels: a larger value is capped at 400, a value below 200 is ignored. Leave it empty to fit the width of the sign-in form within the same limits.
One Tap prompt
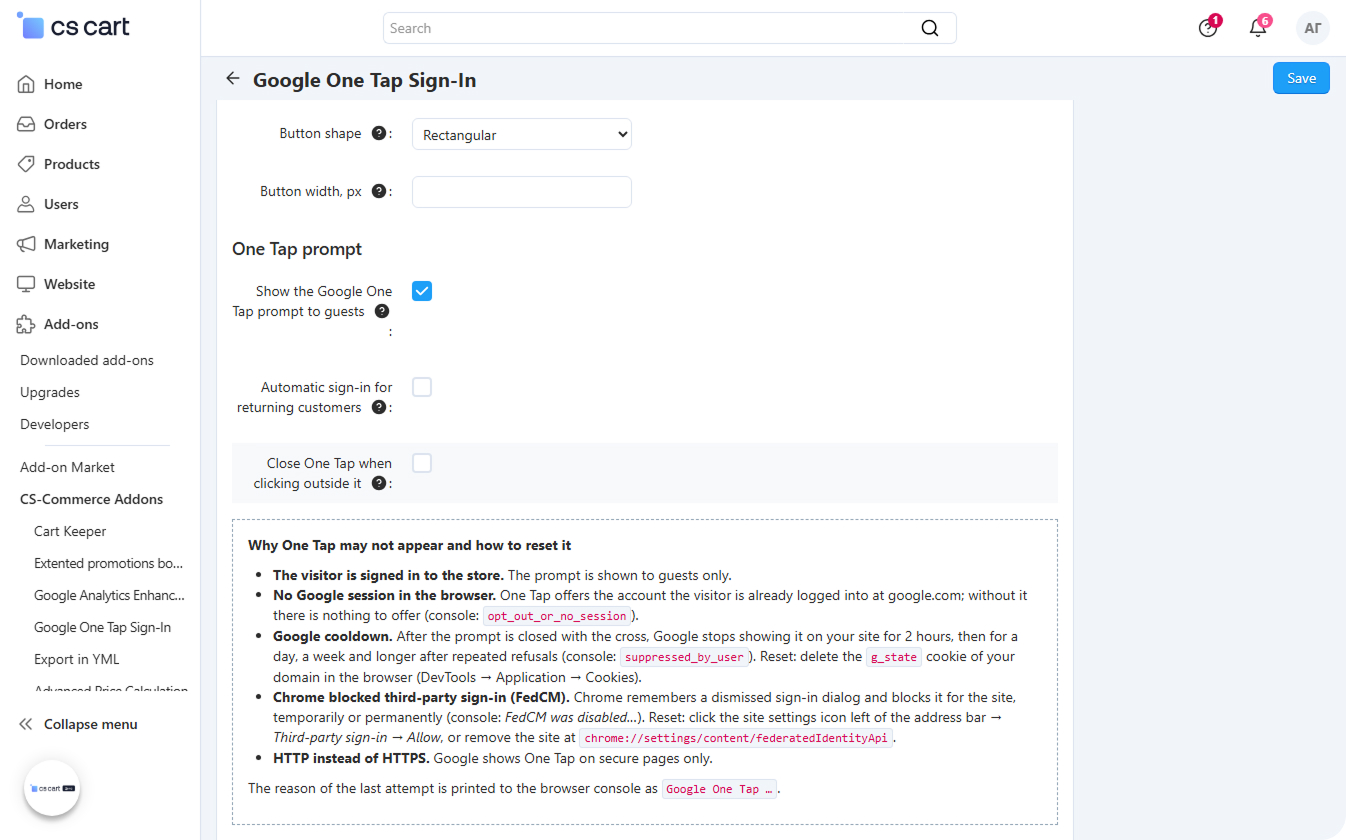
Show the Google One Tap prompt to guests — disabled by default. A guest who is already signed in to Google in the browser sees a small Google panel in the corner of the page offering to sign in with that account. Signed-in customers never see it. The other settings of the group appear only when the prompt is enabled.
Automatic sign-in for returning customers — disabled by default. If the visitor has signed in to the store with Google before and has exactly one Google session in the browser, One Tap signs them in without a click.
Close One Tap when clicking outside it — disabled by default. When enabled, any click on the page outside the prompt closes it. Google and Chrome treat such a closed prompt as a refusal and stop showing One Tap on your site for a while (from 2 hours up to weeks after repeated refusals), so it is recommended to keep it disabled: the prompt then closes only with the cross.
Below the settings there is the Why One Tap may not appear and how to reset it note; the same reasons are covered in the One Tap prompt article.
Customer accounts
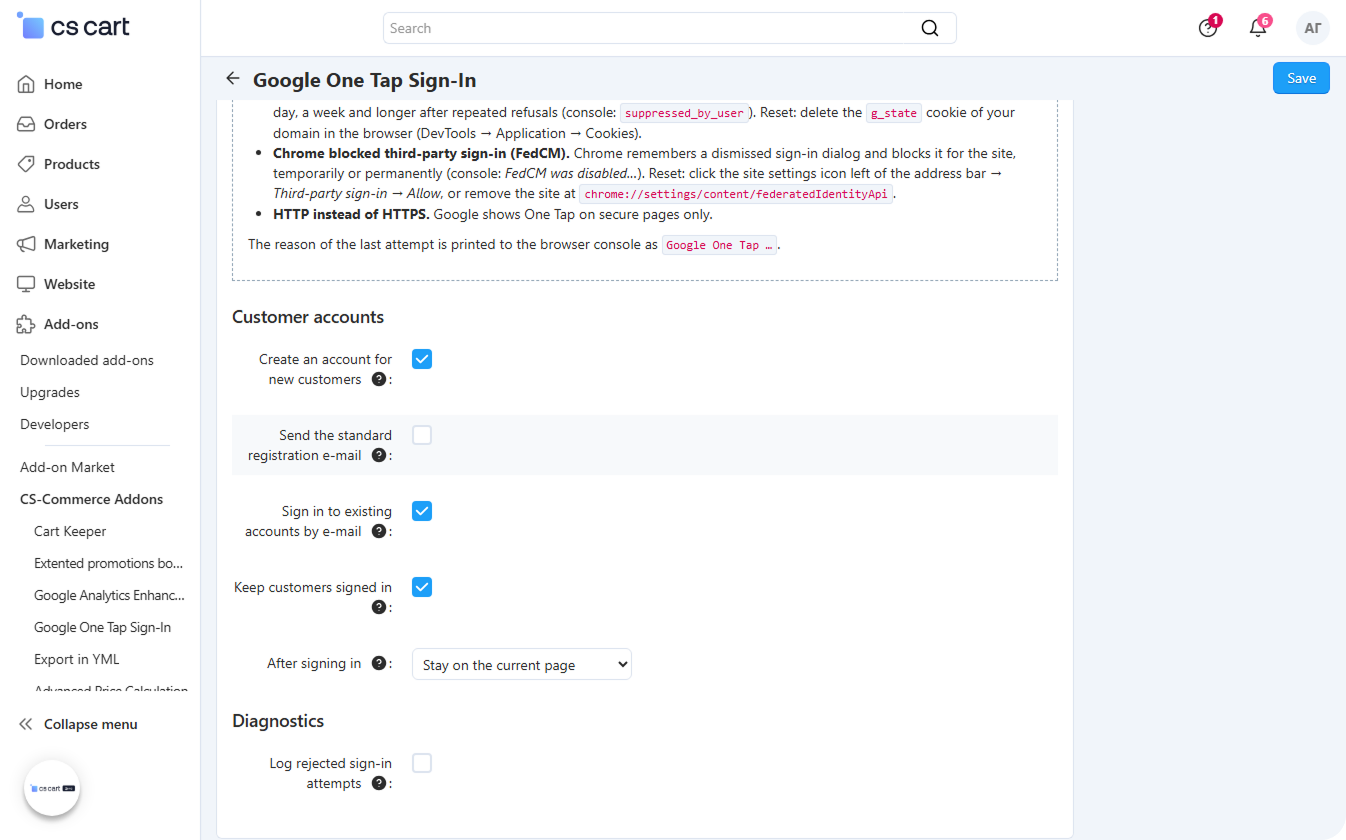
Create an account for new customers — enabled by default. When no account with the Google e-mail exists, a customer profile is created automatically with the first and last name from the Google account. When disabled, such visitors see the message There is no account with this e-mail yet. Please register first.
Send the standard registration e-mail — enabled by default, shown when account creation is enabled. New customers receive the store's regular "profile created" notification.
Sign in to existing accounts by e-mail — enabled by default. If a customer account with the same e-mail already exists, the customer is signed in to it and the Google account is linked to the profile. When disabled, such a customer is asked to sign in with the password first and link Google in the profile settings.
Keep customers signed in — enabled by default. Works like the Remember me checkbox of the regular sign-in form: the customer session is kept in a cookie and survives closing the browser.
After signing in — where the customer goes once signed in through Google: Stay on the current page (default), Open the account page or Open a custom address. The last option reveals the Address after signing in field: a store dispatch (e.g. orders.search) or a full URL of a store page.
Diagnostics
Log rejected sign-in attempts — disabled by default. The reasons of failed Google sign-ins (unverified e-mail, disallowed domain, disabled account, an attempt to sign in as an administrator and others) are written to Administration → Logs together with the account e-mail. The reason codes are listed in the Security and logging article.
The add-on needs a Google OAuth client: by its identifier (Client ID) Google issues a signed token to the customer, and the store checks that the token was issued to your application. The client secret is not used: the customer's browser receives a signed ID token from Google, and the store verifies the signature against Google's public keys.
- Open Google Cloud Console → Credentials and create a project or pick an existing one.
- Configure the OAuth consent screen: user type External, application name, support e-mail.
- Click Create credentials → OAuth client ID, application type Web application.
- In Authorized JavaScript origins add your store addresses. A ready list is shown in the note on the add-on settings page: for every store domain and every storefront — the
https://andhttp://variants. - Copy the Client ID (it ends with
.apps.googleusercontent.com) into the field of the same name in the add-on settings and save the settings.
The Authorized redirect URIs field does not need to be filled in: the add-on works through the Google pop-up and uses no redirects.
Changes in Google Cloud Console do not take effect at once: according to Google, after a domain is added to the origins list it may take from a few minutes to a few hours before the button stops responding with an error.
The storefront must be served over HTTPS: Google shows the One Tap prompt on secure pages only.Where the button appears
With Show the button in sign-in forms enabled, the Google button is rendered below the regular sign-in form behind an or divider: in the sign-in pop-up in the header, on the sign-in page, in the My account block and in the sign-in forms at checkout. On the registration page the button sits below the form with the line or register in one click. The button is drawn by the Google library itself: with the logo, in the storefront language, and for a customer already signed in to Google in the browser it shows their name, e-mail and picture.
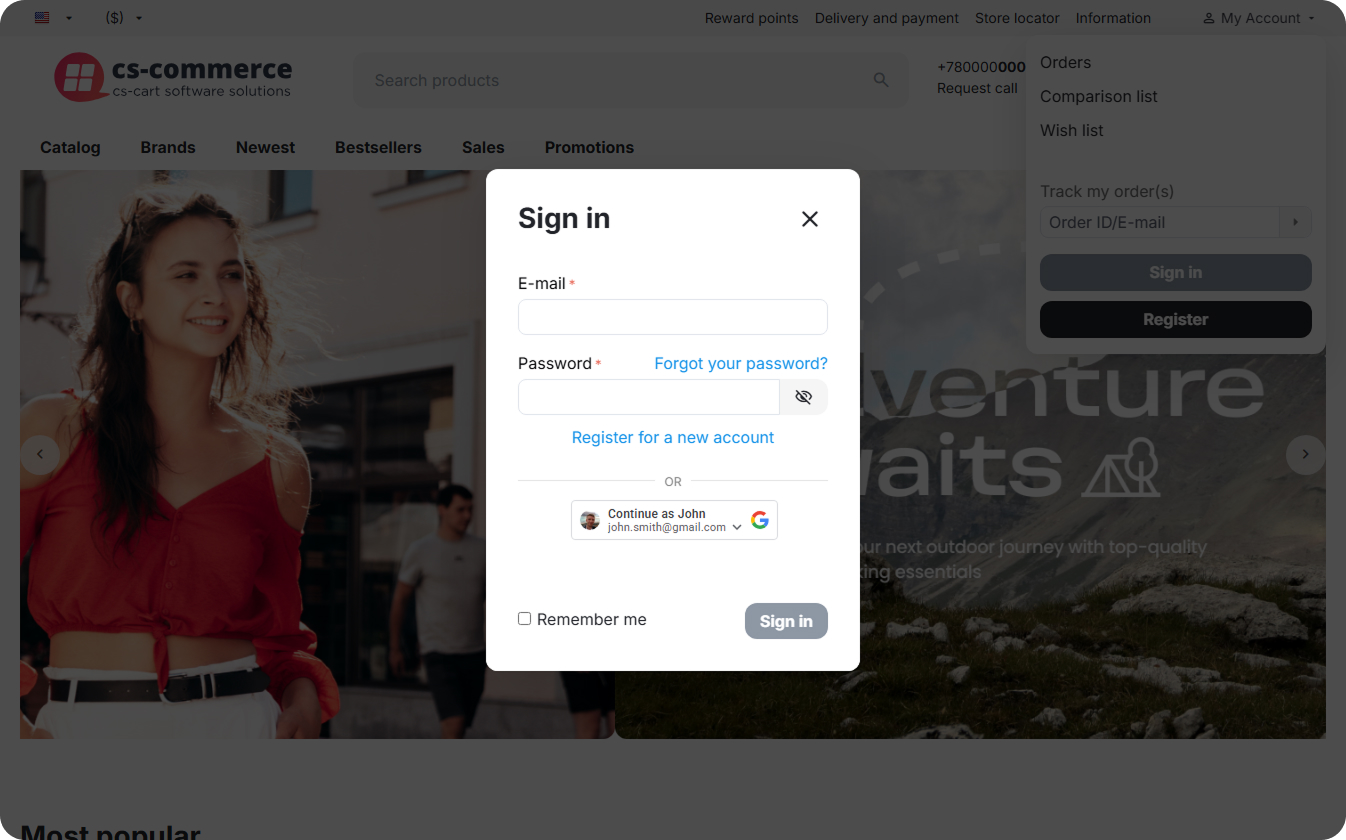
A click on the button opens the Google account chooser. The customer picks an account, Google returns a signed token to the browser, the add-on sends it to the store, and after verification the customer is signed in. Where they land after signing in is set by After signing in: by default they stay on the same page.
One Tap prompt
With Show the Google One Tap prompt to guests enabled, a guest signed in to Google in the browser sees a Google panel with their accounts in the corner of the page. One click on an account and the sign-in is done, without the sign-in form. Customers signed in to the store never see the panel. With Automatic sign-in for returning customers, a visitor who has signed in to the store with Google before and has a single Google session in the browser is signed in without a click.
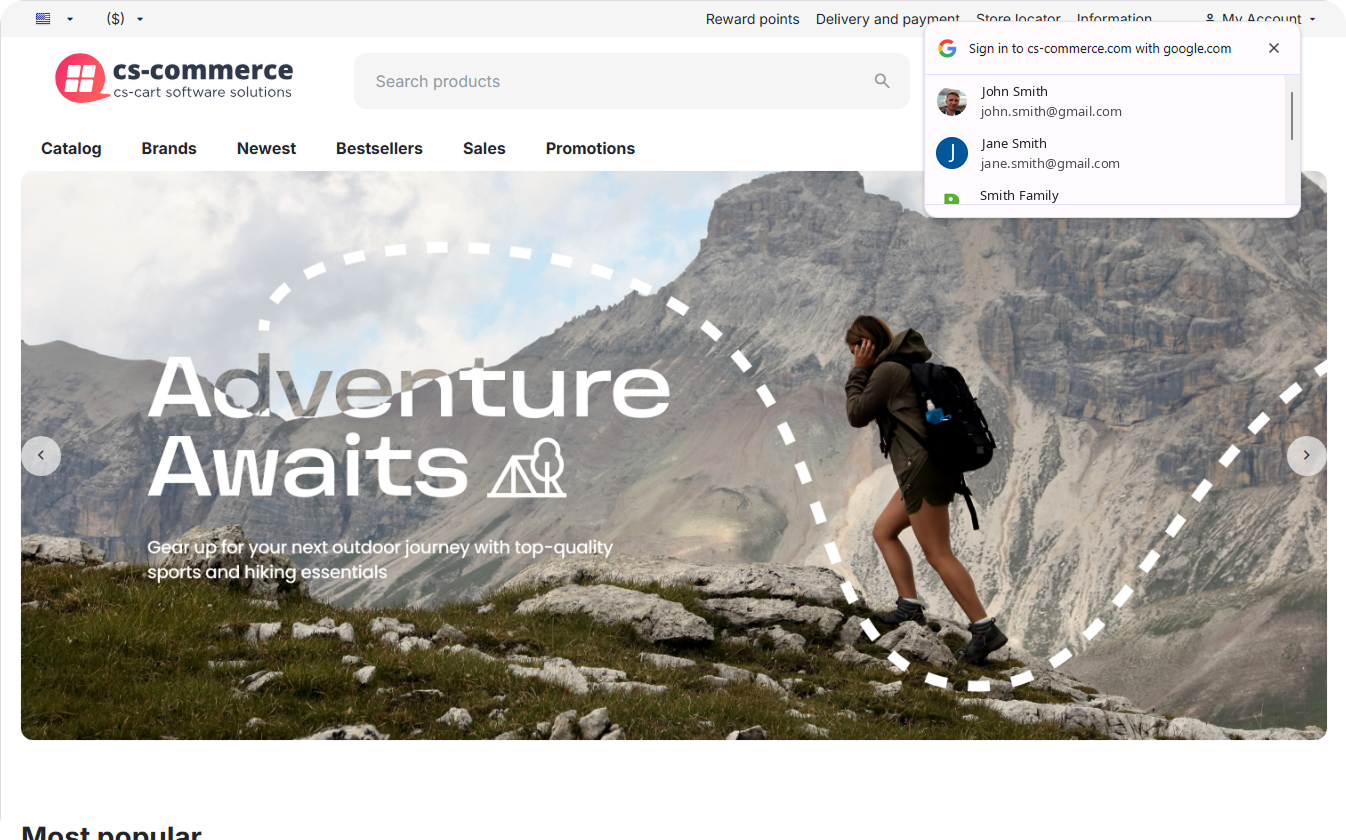
Google does not show the prompt always and to everyone; the reasons and the ways to reset them are covered in the One Tap prompt article.
What happens to the account
- The Google account is already linked to a customer — the customer is signed in to that account.
- The e-mail is known to the store, but the Google account is not linked yet — with Sign in to existing accounts by e-mail enabled, the customer enters the existing account and the Google account gets linked to it. If the first and last name in the profile are blank, they are filled from the Google account; filled fields are left unchanged. When the setting is disabled, the customer sees a message asking to sign in with the password and link Google in the profile settings.
- The e-mail is unknown to the store — with Create an account for new customers enabled, a customer account is created: the e-mail and login are the Google account address, the first and last name come from the Google profile (they are also written to the recipient name of the address), the language is the current storefront language, the password is random. The standard registration e-mail can be sent. The customer sees the message Welcome! Your account has been created and you are signed in. When the setting is disabled, a message asks to register first.
Orders placed as a guest in the same session before signing in are attached to the account. Only customers can sign in through Google: if the e-mail belongs to an administrator or vendor account, the sign-in is rejected with the message Sign-in with Google is available to customers only. A disabled customer account is not let in either.
A customer created through Google is not told any password, but the regular e-mail and password sign-in stays available: a password is set through the standard Forgot your password? link.
Linking the account in the profile
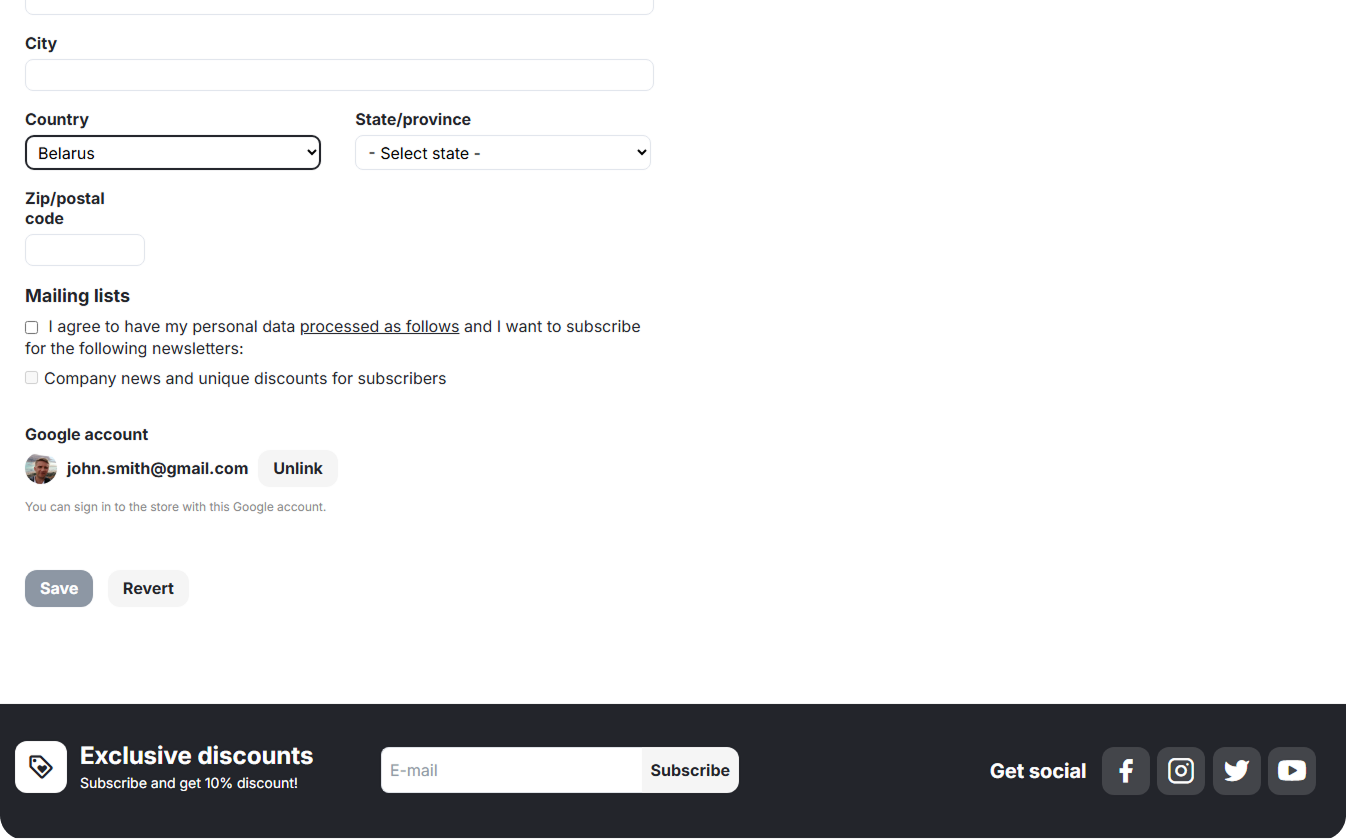
The Google account block appears on the profile page in the customer area. If an account is linked, the block shows the picture and e-mail of the Google account and the Unlink button; after unlinking, a sign-in with this account goes through the e-mail match again.
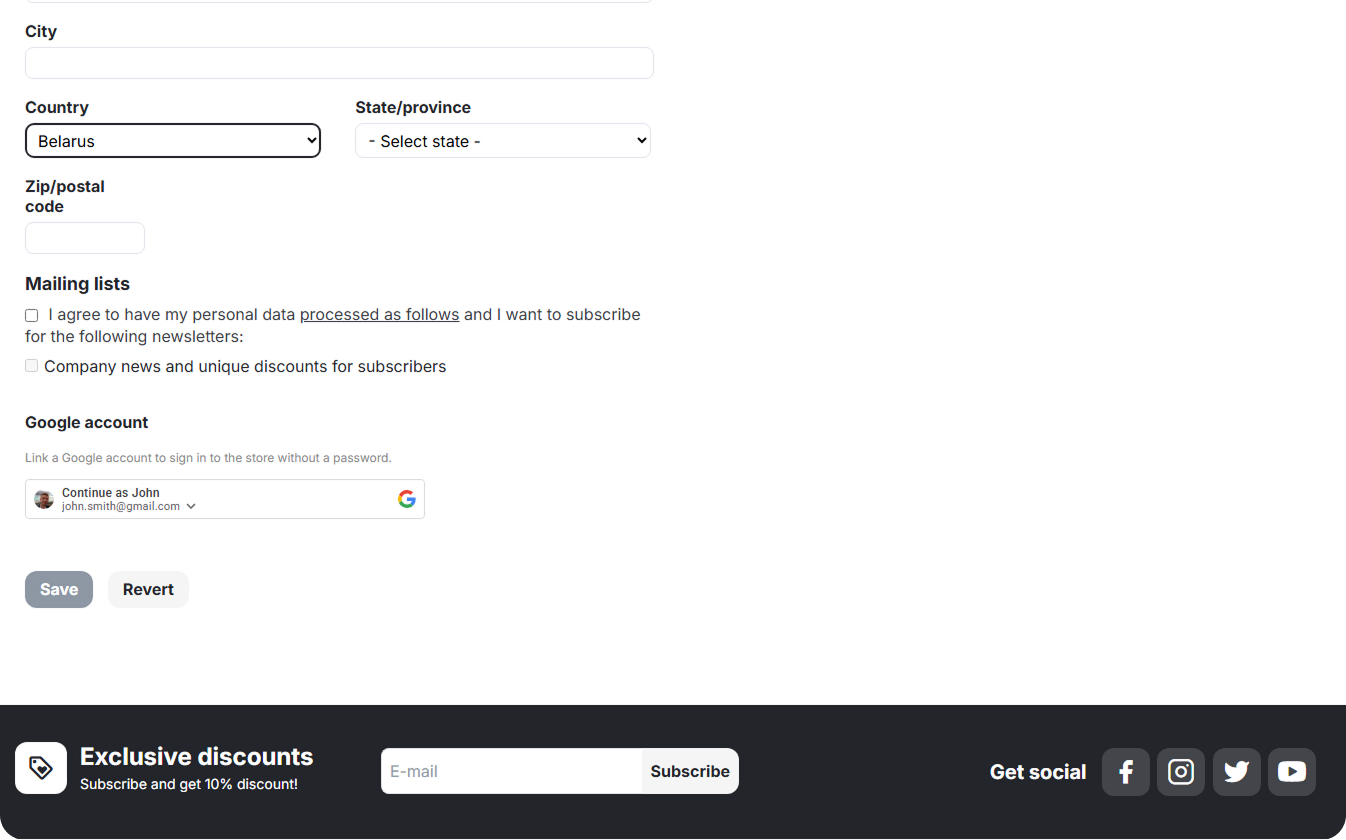
If no account is linked, the block holds the Google button with the hint Link a Google account to sign in to the store without a password: the signed-in customer clicks it and picks the account that will be linked to the profile.
One Google account can be linked to one customer only: an attempt to link an account already tied to another profile is rejected with the message This Google account is already linked to another customer. When a customer account is deleted, the link is removed with it.
The One Tap prompt is shown by Google: the decision is made by its library in the customer's browser, and the add-on merely requests the prompt for guests. If the panel does not appear, the reason is almost always one of the points below. The reason of the last attempt is printed to the browser console as a line starting with Google One Tap.
- The visitor is signed in to the store. The prompt is shown to guests only.
- No Google session in the browser. One Tap offers the account the visitor is already signed in to at google.com; without it there is nothing to offer (console:
opt_out_or_no_session). - Google cooldown. After the prompt is closed with the cross, Google stops showing it on your site for 2 hours, then for a day, a week and longer after repeated refusals (console:
suppressed_by_user). Reset: delete theg_statecookie of your domain in the browser (DevTools → Application → Cookies). - Chrome blocked third-party sign-in (FedCM). Chrome remembers a dismissed sign-in dialog and blocks it for the site, temporarily or permanently (console:
FedCM was disabled…). Reset: click the site settings icon left of the address bar → Third-party sign-in → Allow, or remove the site atchrome://settings/content/federatedIdentityApi. - HTTP instead of HTTPS. Google shows One Tap on secure pages only.
- The domain is missing from the Authorized JavaScript origins of the OAuth client — the browser console shows a Google error about a disallowed origin; check the list in Google Cloud Console.
The same note is shown on the add-on settings page under the One Tap prompt group.
The cooldown is exactly why Close One Tap when clicking outside it is disabled by default: an accidental click outside the panel counts as a refusal for Google, and the prompt disappears for that visitor for hours or days.
Token verification
The customer's browser receives an ID token (a JWT signed with RS256) from Google and passes it to the store; there is no code exchange and no application secret. The add-on verifies the token on the store server:
- the signature — against Google's public keys (
https://www.googleapis.com/oauth2/v3/certs); the keys are cached in the store storage for the period Google advertises, and the set is refreshed when an unknown key is met. If the keys cannot be fetched, the token is verified through Google'stokeninfoservice as a fallback; - the issuer —
accounts.google.com; - the audience — the
audfield of the token matches the Client ID from the settings; - the lifetime — with a 5-minute allowance for clock skew;
- the e-mail is present and verified by Google (
email_verified); - the e-mail domain is in the Allowed e-mail domains list when one is set; the Google Workspace organisation domain (
hd) is taken into account too.
Storefront requests to the add-on are accepted by POST only and are protected by the standard CS-Cart CSRF token check. The return address after signing in is checked against the store domain: a customer cannot be sent to a foreign site through a link parameter.
Who can sign in
Only customer accounts sign in through Google. If the e-mail of the Google account belongs to an administrator or a vendor, the sign-in is rejected. Disabled accounts are not let in. One Google account is linked to at most one customer account.
What the add-on stores
The links are kept in the csc_google_oauth_users table: the Google account identifier, e-mail, name and picture URL from the Google profile, the linking date, the last sign-in date and the number of sign-ins. Google tokens are not stored. A customer created through Google gets a random password stored the standard way. When a customer is deleted, the link record is removed; when the add-on is uninstalled, the table is dropped with all the links.
Log
With Log rejected sign-in attempts enabled, every failed sign-in is written to Administration → Logs as a csc_google_oauth: Sign-in rejected line with the reason code and the account e-mail. The codes and the messages the customer sees:
email_not_verified— Your Google account has no verified e-mail address, so it cannot be used to sign in;domain_not_allowed— Accounts of this e-mail domain are not allowed to sign in here;account_not_found— There is no account with this e-mail yet. Please register first (account creation is disabled);account_exists_not_linked— An account with this e-mail already exists. Sign in with your password and link Google in the profile settings (sign-in to existing accounts is disabled);account_disabled— This account is disabled;not_customer— Sign-in with Google is available to customers only;google_account_taken— This Google account is already linked to another customer;cant_create_profile— Could not create an account. Please register with the form;certs_unavailable— Google is temporarily unavailable. Please try again in a minute (the store could not fetch Google's keys);malformed_token,bad_signature,bad_issuer,bad_audience,token_expired,login_failed— Could not sign in with Google. Please try again or use your e-mail and password.
For developers
Before an account is created, the add-on calls the csc_google_oauth_create_user hook with the token claims and the customer data array passed to fn_update_user(): profile fields can be completed or changed there. On the storefront a failed sign-in triggers the ce.csgo.login_failed event with the error code.
In order to have access to add-on upgrades, you must have an active upgrade subscription. If the subscription period has expired, you will only have access to upgrades released before the expiration date of your subscription. You can renew your upgrades subscription in the "License Management" section on our website.
The add-on supports instant upgrades via the CS-Cart Upgrade Center. The built-in CS-Cart Notification Center (bell) will notify you about new versions release of the add-on. Upgrades via Upgrades Center will allow you to switch to a newer version without losing add-on data and settings.
Before start an upgrade process, it is highly recommended to make a full backup of the site (database and files) of your store using the server or hosting methods.
Upgrade through the Upgrade Center
- In the top menu, go to Administration → Upgrade Center;
- In the gear menu, click "Refresh available upgrades"
- Find and add-on on list of available upgrades and click the Download button and than Install button;
- Follow all the instructions that will be shown during the upgrade process;
- It is recommended to clear the CS-Cart templates cache after the upgrades are installed by deleting the var/cache folder on your server or adding the ctpl parameter to the address bar (example: https://domain.com/admin.php?ctpl).
Addon Reinstallation by uninstall old and install new:
Reinstalling an add-on means deleting the add-on's settings and data. Reinstallation will allow you to get a clean installation of the latest addon version. To reinstall the add-on with saving the add-on settings and data, please contact us via our Support Center to provide this service.
To completely reinstall an add-on without saving data, follow these steps:
- Go to Add-ons → Manage add-ons and find the old installed add-on.
- Click the delete button in the gear menu of the add-on.
- Download the latest version of the add-on on our website in the "License Management" section.
- Go to Add-ons → Manage add-ons and in the gear menu select Manual Installation. Select the previously downloaded file and complete the installation of the add-on.
The technical support of the add-on is already included in its price. Before contacting the support center, please make sure you are using the latest released version of the add-on. Old versions of the add-on are not supported by technical support.
To use our technical support, follow these steps:
- On our support center site https://helpdesk.cs-commerce.com/, log in with your account;
- Click on the "Create ticket" button;
- Fill in all the required fields and create ticket (you will receive a confirmation email);
- Expect a response from a specialist (a notification will be sent to your e-mail about the response) in accordance with the regulations of the technical support service.
If you have not received an answer within the time frame specified in the regulations, write us a message to the e-mail [email protected] with the subject of the ticket and we will try to resolve your issue as soon as possible.
Technical support via chat on the site, direct phone calls or e-mail letters is not provided. All help discuss goes through the support center. Carefully study the documentation for the add-on and the terms of technical support before creating a ticket. We recommend that you familiarize with the general restrictions:
- Fragments of code or some files of an add-on may have a private (encoded) part. The coded part does not create problems on add-on customizations;
- The add-on will work only on those domains that are specified in the user's license. If you try to use the solution the domains of which are not included in the license, the add-on will be automatically disabled;
- Installing on local machines is not allowed by the licensing system. For the add-on to work on an additional domain (alias), specify this alias on the license management page. Up to three aliases are allowed per domain for testing and development purposes. You can change the main license domain yourself on the license management page.
To have possibility to add or change license domains and aliases, the upgrade subscription must be active. To change the license domain of an expired upgrades subscription, you must first renew your subscription.
Version 1.0 of September 28, 2026
- The first release of the add-on: one-click sign-in and registration with Google, the One Tap prompt, linking a Google account in the customer area, button and account creation settings.