Import/Export Categories
Import/export categories
Import/export categories
Out of the box, CS-Cart cannot export categories to a file or import them from one: data import and export work with products, features, orders, but not with the category tree. The add-on adds categories to the standard Administration → Export data and Administration → Import data sections — with the same interface, field layouts and CSV format as products.
Export saves the whole tree or only the selected categories: the path in the tree, names and descriptions in the languages you need, status, position, image with alt text, SEO name, meta tags, user groups, storefront.
Import creates new categories and updates existing ones. A category in the file is matched to a store category by its category code — a field the add-on adds to every category. By changing the category path in the file, you can rename a category or move it to another branch of the tree.
Before every import the add-on saves a backup of the category and SEO name tables by default, so a mistake in the file can be rolled back.
Export and import have separate access privileges, so an employee can be allowed to export categories without being able to change them.
The add-on works on CS-Cart and Multi-Vendor starting from version 4.3.1 and supports the CS-Cart, CS-Cart Ultimate, Multi-Vendor, Multi-Vendor Plus and Multi-Vendor Ultimate editions. Since version 1.7.0 the add-on is compatible with PHP 8.3.
- CS-Cart Ultimate — categories are exported and imported together with their storefront (the
Storefield). - Multi-Vendor — the
Store(storefront) field is available starting from CS-Cart 4.14.1. - The Comments and reviews add-on — when it is active, the file gets a
Discussionfield with the review type of the category. - The SEO add-on — when it is active, the file gets a
SeoNamefield. - The Vendor plans: Commissions by category add-on (Multi-Vendor) — when it is active, the fee of every vendor plan is exported and imported as a separate column (since version 1.6.0).
At the moment there is no information about the add-on being incompatible with any theme. If the add-on conflicts with your theme, please contact our support center.
After success payment, your order will be automatically marked as Paid within a few minutes. Once order changed to Paid status - add-on License activation passed success and you will received an e-mail with confirmation the receipt of payment and a second e-mail with a download add-on link. You can also download the add-on in our License Management section of our website. To install the add-on on your website, please follow these steps:
- Download the latest version of the add-on on our website in the "License Management" section or via the link sent by e-mail.
- Go to Add-ons → Manage Add-ons and in the gear button, select Manual Installation.
- Select the downloaded file and complete the installation of the add-on.
Add-on installation is completed. To go to the add-on settings page, select the installed add-on in the top menu Add-ons → CS-Commerce add-on
The add-on works in three places of the admin panel:
- Administration → Export data → Categories and Administration → Import data → Categories — exporting and importing the file;
- Products → Categories — export of the selected categories and of their products, the Category code field on the category page;
- Add-ons → CS-Commerce Addons → Import/export categories — the add-on page with generation of missing category codes.
The add-on has no global settings: everything that affects export and import is chosen in the export and import options. The only thing to prepare is the category codes.
Category code
The category code is what the import uses to find a category in the store. It is unique within one storefront. The field is on the category page, the Add-ons tab, the Import/export categories section.
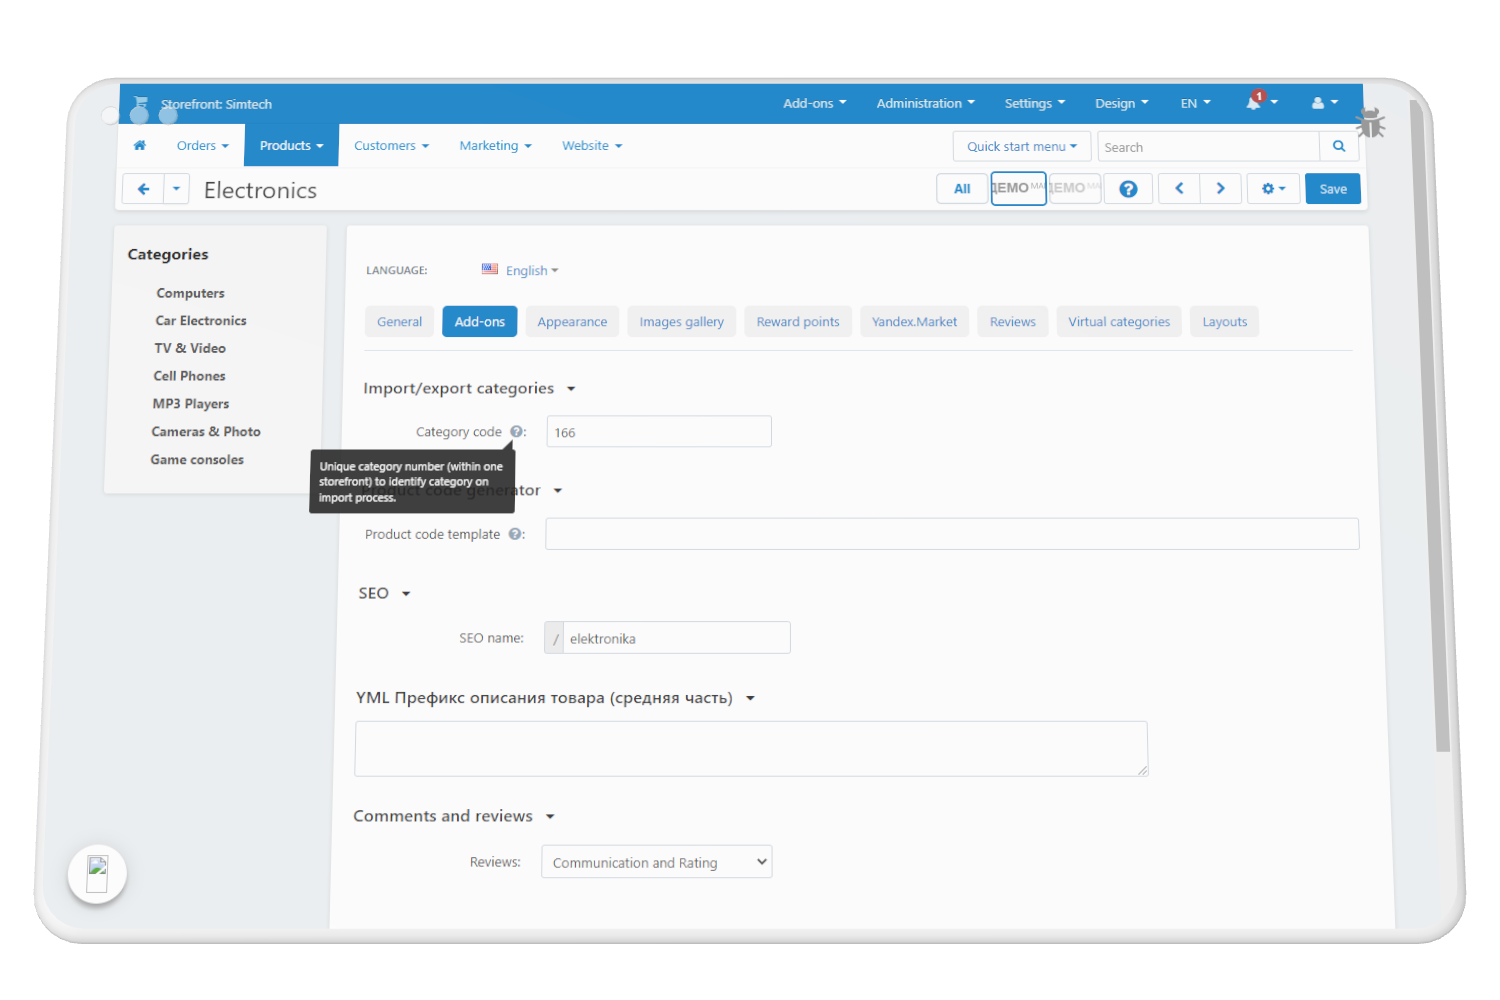
- On installation the add-on fills in the codes of all existing categories with their IDs.
- If a category is saved with an empty code, the code is filled in with its ID.
- You can replace the code with your own, for example with the category code from your accounting system — the import will then match categories by it.
Generating missing codes
If some categories have no code (for example, they were created another way before the add-on was installed), open Add-ons → CS-Commerce Addons → Import/export categories, click the gear button and choose Generate category codes for categories without it. The number of such categories is shown in brackets. The code becomes the category ID; if that ID is already taken by another category's code, a random two-letter prefix is added, for example KX-245.
Open Administration → Export data → Categories. The page works the same way as product export: exported fields on the left, available fields on the right, and the field layout can be saved and picked later from the Layouts list. The mandatory fields are CategoryCode, CategoryPath and Language, and in CS-Cart Ultimate, when all storefronts are selected, Store as well.
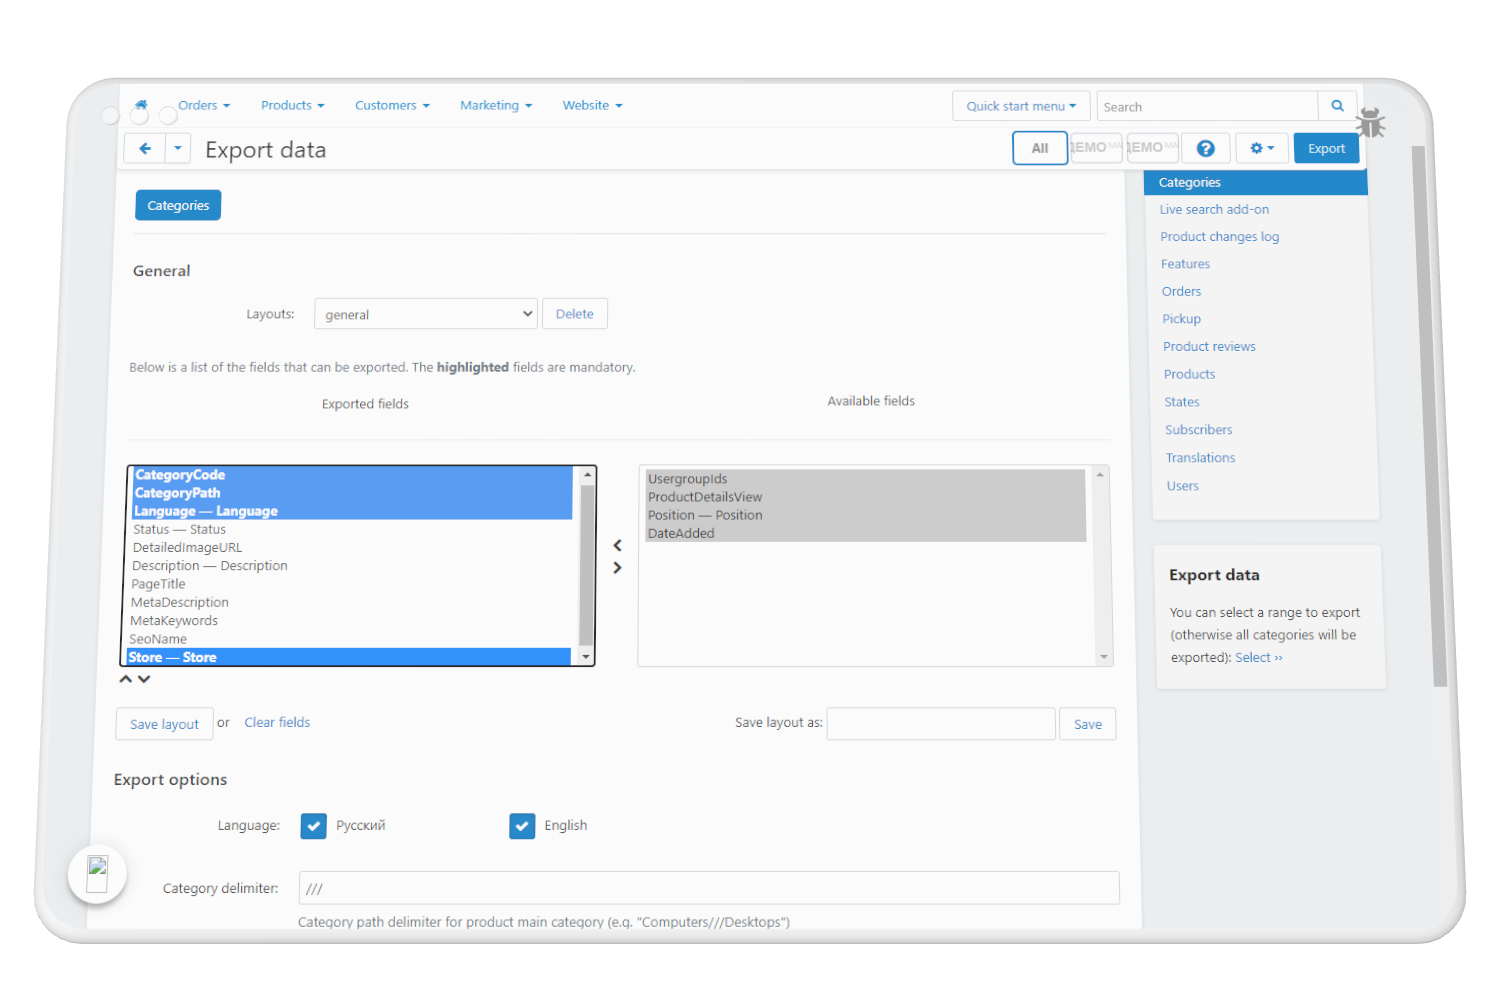
Export options:
- Language — the languages to export names, descriptions and meta tags in. For every selected language a category is exported as a separate row.
- Category delimiter — what separates the levels in a category path,
///by default:Electronics///Computers///Laptops. - The CSV delimiter, file name and other options are standard, the same as for product export.
Categories are exported level by level: root categories first, then their subcategories and so on. Such a file can be imported back as is — parent categories always come before their children in it.
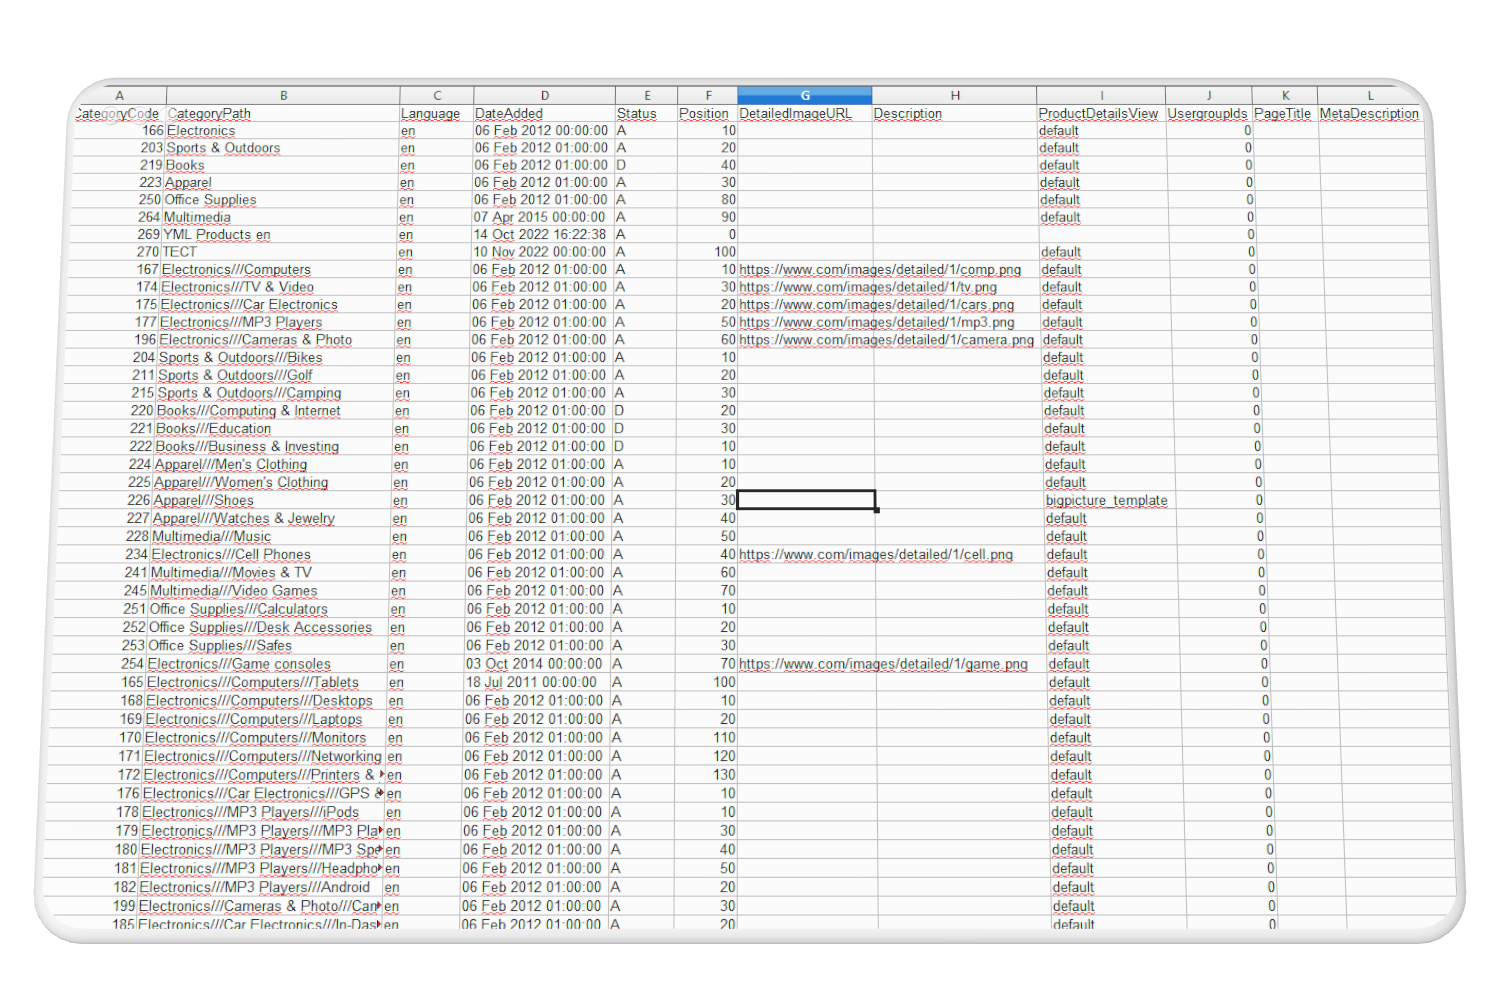
Exporting selected categories
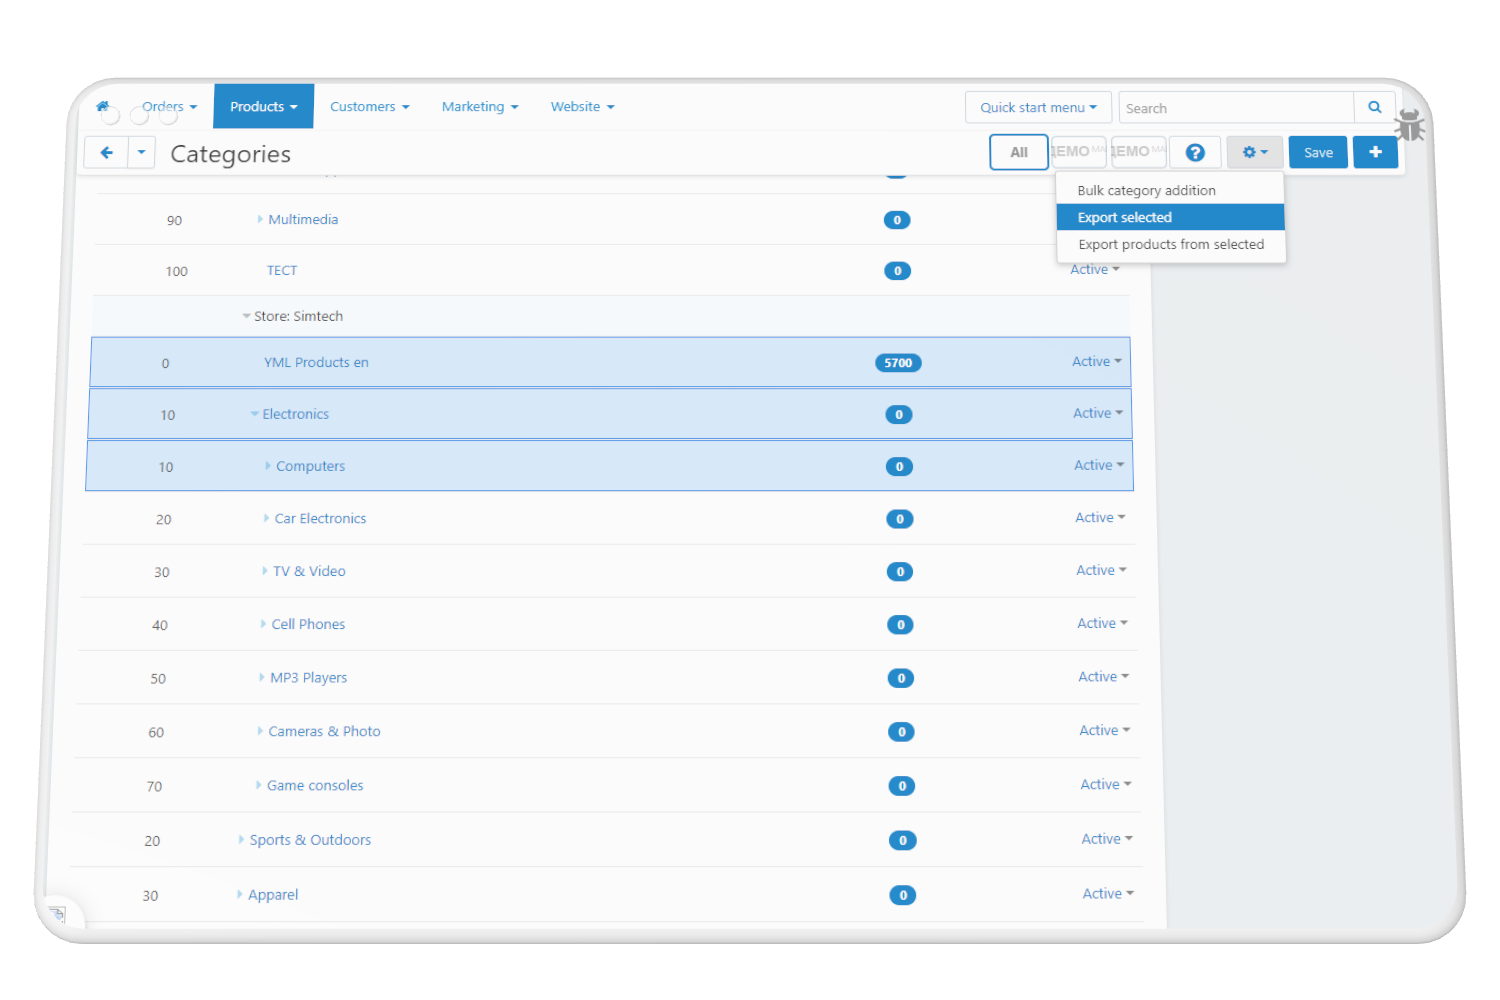
To export a part of the tree instead of the whole of it, check the categories in the Products → Categories list, click the gear button and choose Export selected. The export page opens with the range of the checked categories already set. You can also pick categories from the export page itself, with the link in the sidebar.
The Export products from selected item in the same menu opens the standard product export with a range of all products of the checked categories, including subcategories.
Open Administration → Import data → Categories. The top of the page lists the fields the file can contain; the mandatory ones are highlighted. The easiest way to get a file in the right format is to export the categories and edit that file.
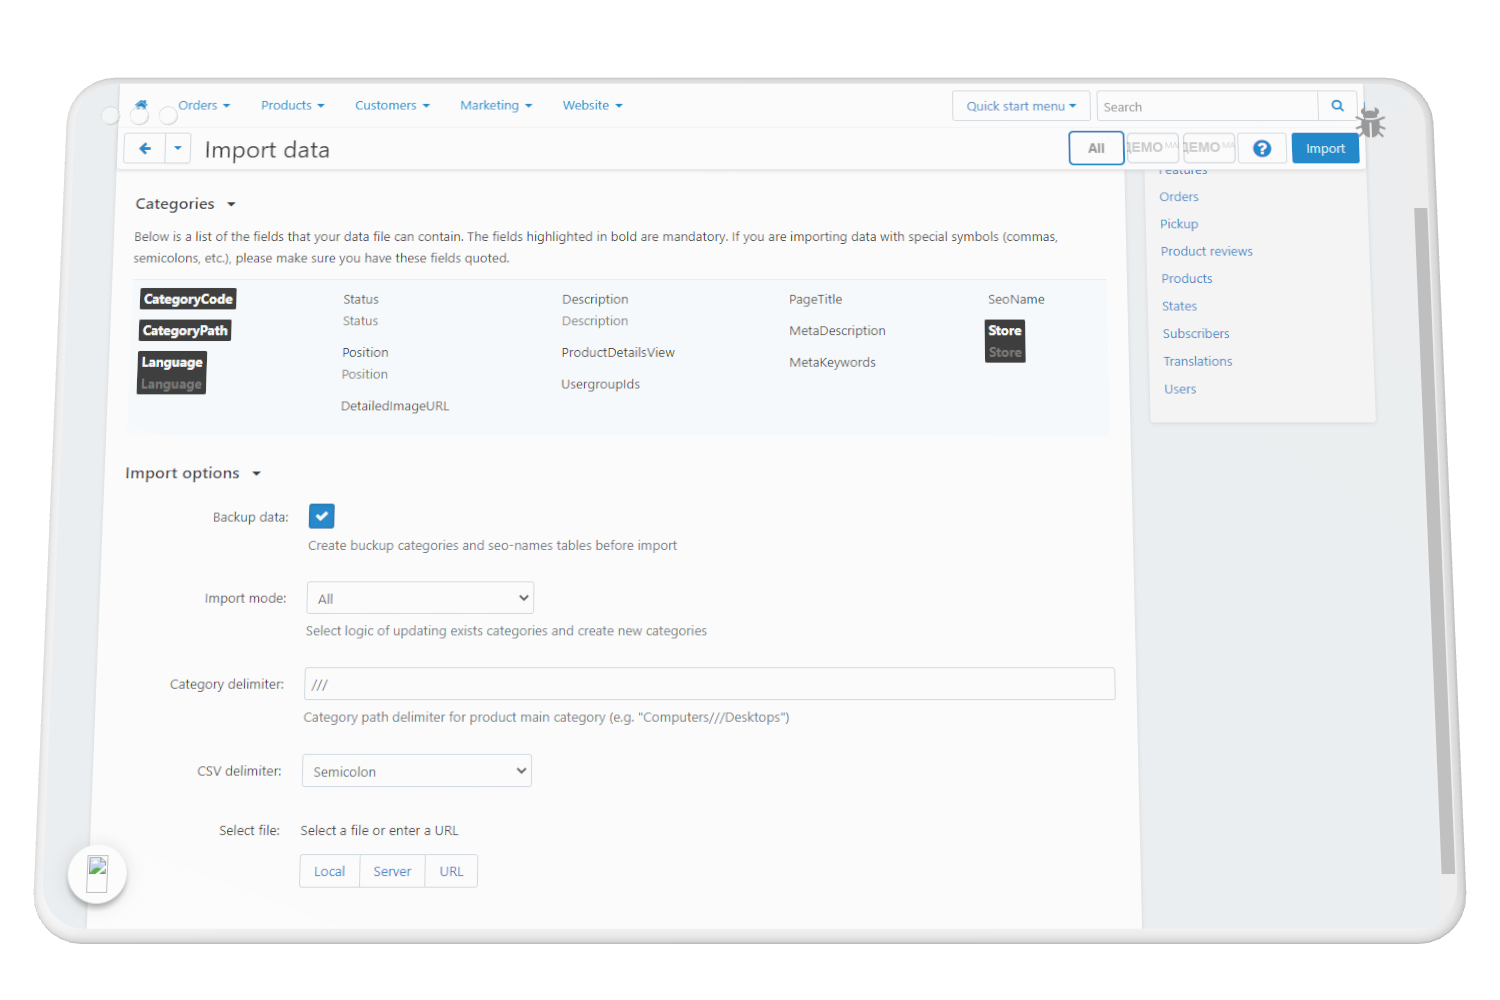
Import options:
- Backup data — save the category, category description and SEO name tables before the import. Enabled by default.
- Import mode:
- All — categories found by their code are updated, the rest are created;
- Update only exist categories — rows with unknown codes are skipped;
- Create only new categories — rows with codes that already exist in the store are skipped.
- Category delimiter — must match the delimiter in the
CategoryPathfield of the file,///by default.
Skipped rows are counted as skipped in the import summary.
How a category is found and created
- A category is looked up by
CategoryCode; in CS-Cart Ultimate — within the storefront from theStorefield (or the current storefront, if one is selected in the admin panel). - The last element of
CategoryPathis the name of the category itself, everything before it is the path to the parent. Parent categories are looked up by name, level by level, from the root. - To rename a category, change the last element of the path; to move it to another branch, change the path to the parent. Keep the code the same.
- A new category gets a name in every store language: from the file for the languages present there, and in the language of the first row for the rest.
A parent category must exist in the store or come earlier in the file than its child. If the parent in the path is not found, the add-on warns "Parent category not exist: …" and creates the category inside the last category of the path it did find — check such categories after the import.If something went wrong
The backup is saved as a regular CS-Cart backup named categories_backup_<date>_<time>.sql in a zip archive. You can restore it in Administration → Backup/Restore — the category, category description and SEO name tables return to their state before the import.
The backup covers only the category, category description and SEO name tables. Category images, reviews and vendor fees are not included.
Large catalogs
There is no need to split the file: since version 1.7.0 the import goes through in full on catalogs of several thousand categories and runs 2–3 times faster than before. In versions before 1.7.0 the import could stop on large catalogs before all categories were loaded — if you ran into this, upgrade the add-on.
Mandatory fields are in bold.
CategoryCode— the category code the import uses to find the category.CategoryPath— the path in the tree joined with the category delimiter:Apparel///Shoes. The last element is the category name. The value is in the language of the row.Language— the language code of the row:en,ru.CategoryId— the category ID. Export only.DateAdded— the creation date. Export only.CategoryUrl— the link to the category page on the storefront. Export only (since version 1.5.0).Status—Aactive,Ddisabled,Hhidden.Position— the position among sibling categories.DetailedImageURL— the category image. On export — the image address followed by the alt text per language in curly brackets:https://.../image.png#{[en]:Shoes;[ru]:Обувь;}. On import — an address or a file path in the same format. If the file name matches the image already uploaded for the category, the file is not uploaded again; only the alt text is updated.Description— the category description in the language of the row.PageTitle,MetaDescription,MetaKeywords— the page title and meta tags in the language of the row.SeoName— the SEO name of the category. Present when the SEO add-on is active.ProductDetailsView— the product page template for the category, for exampledefault.UsergroupIds— IDs of the user groups the category is visible to;0means everyone.Store— the storefront name. In CS-Cart Ultimate it is mandatory when all storefronts are selected in the admin panel; in Multi-Vendor it is available since CS-Cart 4.14.1.Discussion— the review type of the category:Bcommunication and rating,Ccommunication,Rrating,Ddisabled. Present when the Comments and reviews add-on is active.Vendor categories fee - <vendor plan>— the category fee in percent, a separate column for every vendor plan. Present in Multi-Vendor when the Vendor plans: Commissions by category add-on is active.
In order to have access to add-on upgrades, you must have an active upgrade subscription. If the subscription period has expired, you will only have access to upgrades released before the expiration date of your subscription. You can renew your upgrades subscription in the "License Management" section on our website.
The add-on supports instant upgrades via the CS-Cart Upgrade Center. The built-in CS-Cart Notification Center (bell) will notify you about new versions release of the add-on. Upgrades via Upgrades Center will allow you to switch to a newer version without losing add-on data and settings.
Before start an upgrade process, it is highly recommended to make a full backup of the site (database and files) of your store using the server or hosting methods.
Upgrade through the Upgrade Center
- In the top menu, go to Administration → Upgrade Center;
- In the gear menu, click "Refresh available upgrades"
- Find and add-on on list of available upgrades and click the Download button and than Install button;
- Follow all the instructions that will be shown during the upgrade process;
- It is recommended to clear the CS-Cart templates cache after the upgrades are installed by deleting the var/cache folder on your server or adding the ctpl parameter to the address bar (example: https://domain.com/admin.php?ctpl).
Addon Reinstallation by uninstall old and install new:
Reinstalling an add-on means deleting the add-on's settings and data. Reinstallation will allow you to get a clean installation of the latest addon version. To reinstall the add-on with saving the add-on settings and data, please contact us via our Support Center to provide this service.
To completely reinstall an add-on without saving data, follow these steps:
- Go to Add-ons → Manage add-ons and find the old installed add-on.
- Click the delete button in the gear menu of the add-on.
- Download the latest version of the add-on on our website in the "License Management" section.
- Go to Add-ons → Manage add-ons and in the gear menu select Manual Installation. Select the previously downloaded file and complete the installation of the add-on.
The technical support of the add-on is already included in its price. Before contacting the support center, please make sure you are using the latest released version of the add-on. Old versions of the add-on are not supported by technical support.
To use our technical support, follow these steps:
- On our support center site https://helpdesk.cs-commerce.com/, log in with your account;
- Click on the "Create ticket" button;
- Fill in all the required fields and create ticket (you will receive a confirmation email);
- Expect a response from a specialist (a notification will be sent to your e-mail about the response) in accordance with the regulations of the technical support service.
If you have not received an answer within the time frame specified in the regulations, write us a message to the e-mail [email protected] with the subject of the ticket and we will try to resolve your issue as soon as possible.
Technical support via chat on the site, direct phone calls or e-mail letters is not provided. All help discuss goes through the support center. Carefully study the documentation for the add-on and the terms of technical support before creating a ticket. We recommend that you familiarize with the general restrictions:
- Fragments of code or some files of an add-on may have a private (encoded) part. The coded part does not create problems on add-on customizations;
- The add-on will work only on those domains that are specified in the user's license. If you try to use the solution the domains of which are not included in the license, the add-on will be automatically disabled;
- Installing on local machines is not allowed by the licensing system. For the add-on to work on an additional domain (alias), specify this alias on the license management page. Up to three aliases are allowed per domain for testing and development purposes. You can change the main license domain yourself on the license management page.
To have possibility to add or change license domains and aliases, the upgrade subscription must be active. To change the license domain of an expired upgrades subscription, you must first renew your subscription.
Version 1.7.0 of October 7, 2026
- Added PHP 8.3 compatibility.
- Fixed category import on stores with a large catalog: the import could stop before all categories from the file were loaded; it now runs 2–3 times faster with less server load.
- Improved compatibility of category discussion import with older CS-Cart versions.
- Basic security updates of the add-on.
Version 1.6.1 of March 11, 2025
- Fixed data import on some configurations.
Version 1.6.0 of February 20, 2025
- Added compatibility with the «Vendor plans: Commissions by category» add-on for CS-Cart Multi-Vendor.
Version 1.5.0 of September 11, 2024
- Added export of the category page link.
- Added import and export of the review type (Comments and reviews add-on).
- If a category code is not set, it is filled in with the category ID.
- Basic security updates of the add-on.
Version 1.4.0 of May 29, 2024
- Fixed import of category SEO names on some configurations.
- Basic security update of the add-on.
Version 1.3 of April 28, 2023
- Added export and import of category images with alt text.
Version 1.2 of January 30, 2023
- Added generation of codes for categories that have none.
Version 1.1 of January 17, 2023
- Fixed import of category names in a multilingual store.
Version 1.0 of December 27, 2022
- The first release of the add-on.